

Are you looking to boost your FPS and overall PC performance for gaming? You've come to the right place! In this guide, we'll discuss various tips and tricks to optimize your gaming experience and maximize your system's potential.
Why It's Important to Optimize Your PC for Gaming
For both laptop and desktop users, optimizing your PC for gaming is essential to avoid performance problems such as low FPS, stuttering, freezing, and frame rate drops in the game. A well-optimized PC will provide a smoother and more enjoyable gaming experience, allowing you to fully immerse yourself in your favorite titles. So let's dive in and learn how to boost PC performance for gaming!
How to Boost Performance and Increase FPS in PC Games
Below we'll cover numerous solutions that can help improve your PC's performance and increase FPS. We'll provide step-by-step instructions for each technique, ensuring that you can easily apply these tips to your own system.
1. Update Your Graphics Drivers
One of the simplest and most effective ways to boost your gaming performance is by keeping your graphics drivers up-to-date. Graphics drivers are essential for maintaining optimal communication between your GPU and other hardware components.
Note: In some cases, it's necessary to completely uninstall existing GPU drivers before updating to the latest version. This is because remnants of old drivers can cause conflicts or compatibility issues, potentially leading to performance problems or even crashes. To avoid these issues, we recommend using Display Driver Uninstaller (DDU), a powerful tool designed to remove GPU drivers thoroughly. For a detailed guide on how to use DDU, check out this tutorial: How to Completely Uninstall GPU Drivers - DDU Guide.
NVIDIA Graphics Drivers
To download the latest NVIDIA graphics drivers, visit the NVIDIA Driver Downloads page. Select your GPU model, operating system, and other relevant information, then click "Search" to find the appropriate driver.
AMD Graphics Drivers
For the latest AMD graphics drivers, head over to the AMD Driver and Support page. Choose your product from the list, or use the auto-detect tool to identify your GPU. Once you've found the right driver, click "Download" to begin the process.
Intel Graphics Drivers
To download Intel graphics drivers, visit the Intel Driver & Support Assistant page. Use the auto-detect tool to identify your Intel GPU and download the appropriate driver.
After downloading the correct graphics driver for your GPU, don't forget to use DDU to uninstall any existing drivers before installing the new ones. This will ensure a clean, conflict-free installation and help you avoid potential performance issues.
2. Best NVIDIA Control Panel Settings
For NVIDIA users, optimizing the settings in the NVIDIA Control Panel can lead to significant performance improvements. Here's how:
- Open the NVIDIA Control Panel
- Then go to the "Adjust Image Settings with Preview" section.
- Select Use the advanced 3D image settings and hit the Apply button.
- After that go to Manage 3D Settings.
- Select Program Settings and choose the game you want to optimize from the list.
- Adjust the settings to maximize performance. Some suggested settings include:
- Image Sharpening: Off
- Ambient Occlusion: Performance
- Anisotropic Filtering: Application-controlled
- Antialiasing - FXAA: Off
- Antialiasing - Gamma Correction: On
- Antialiasing - Mode: Application-controlled
- Antialiasing - Setting: Application-controlled
- Antialiasing - Transparency: Off
- CUDA - GPUs: All
- Low Latency Mode: Ultra
- Max Frame Rate: Off (or set a value based on your monitor's refresh rate)
- Multi-Frame Sampled AA (MFAA): Off
- OpenGL Rendering GPU: Auto-select
- Power Management Mode: Prefer maximum performance
- Texture Filtering - Anisotropic sample optimization: On
- Texture Filtering - Negative LOD bias: Allow
- Texture Filtering - Quality: High performance
- Texture Filtering - Trilinear optimization: On
- Threaded Optimization: On
- Triple Buffering: Off
- Vertical Sync: Off (or set to Adaptive if you experience screen tearing)
- Virtual Reality pre-rendered frames: 1
- Virtual Reality - Variable Rate Super Sampling: Off
- Also, select your dedicated NVIDIA GPU (High-performance NVIDIA processor) as the preferred graphics processor for the game by choosing it from the drop-down menu next to "Select the preferred graphics processor for this program".
- After that click on the Apply button.
After applying these settings, be sure to test your game and adjust individual settings as needed to find the perfect balance between visual quality and performance. Keep in mind that the optimal settings may vary depending on your hardware and the specific game you're playing.
3. Best AMD Software Settings
Optimizing your AMD Software settings can significantly boost PC performance for gaming.
- Open the AMD Radeon Software: Right-click on your desktop and select AMD Radeon Software from the context menu to open the application.
- Navigate to the Gaming Tab: In the AMD Radeon Software window, click on the Gaming tab located at the top of the window.
- Select the Game Profile: Choose the game you want to optimize from the list of installed games or add it manually by clicking on the Add button.
- Adjust Anti-Aliasing Settings: In the game profile, locate the Anti-Aliasing setting and set it to Use application settings. This allows the game to control the level of anti-aliasing.
- Modify Anisotropic Filtering: Find the Anisotropic Filtering setting and set it to Use application settings. This enables the game to manage texture filtering.
- Configure Texture Filtering Quality: Change the Texture Filtering Quality setting to Performance. This reduces the filtering quality slightly but can improve performance.
- Tweak Tessellation Mode: Set the Tessellation Mode to Override application settings and adjust the Maximum Tessellation Level according to your preference. Lower levels can help boost performance.
- Optimize Shader Cache: Enable the Shader Cache setting, which allows the GPU to store compiled shaders, reducing load times and stuttering.
- Enable Radeon Chill: Turn on Radeon Chill to improve power efficiency and lower GPU temperatures by dynamically regulating the frame rate based on your in-game movements.
- Adjust Radeon Image Sharpening: Set Radeon Image Sharpening to Enabled and adjust the Sharpness slider to your preference. This can enhance image quality without a significant impact on performance.
- Activate Radeon Anti-Lag: Enable Radeon Anti-Lag to reduce input lag, providing a more responsive gaming experience.
- Enable Radeon Boost: Turn on Radeon Boost to dynamically lower the resolution during fast-paced action, increasing performance without a noticeable loss in visual quality.
4. Best Intelligent Standby List Cleaner Settings
Intelligent Standby List Cleaner (ISLC) is an excellent tool for optimizing the performance of your PC and securing a huge performance boost for gaming, particularly when it comes to addressing memory leaks and stuttering issues. In this section, we'll delve into the best ISLC settings for different RAM capacities and offer additional tips for maximizing the tool's effectiveness.
Recommended Settings for ISLC
- Run ISLC as Administrator: This ensures ISLC has the necessary privileges to function optimally.
- Set "The list size is at least": Adjust this value based on your total system RAM:
- For 8 GB RAM: Set the value to 4096 MB (half of your total RAM)
- For 16 GB RAM: Set the value to 8192 MB
- For 32 GB RAM: Set the value to 16384 MB
- Set "Free memory is lower than": Configure this value according to your total system RAM:
- For 8 GB RAM: Set the value to 1024 MB
- For 16 GB RAM: Set the value to 2048 MB
- For 32 GB RAM: Set the value to 4096 MB
- Enable Custom Timer Resolution: Check this box to specify a custom timer resolution for ISLC, which can enhance performance.
- Set Wanted Timer Resolution: Input "0.50" as the preferred timer resolution.
- Adjust ISLC Polling Rate: Set the polling rate to 500 ms to strike a balance between performance and CPU usage.
- Enable Auto-start and Launch at Logon: Check both boxes to ensure ISLC starts automatically when you log in to Windows.
- Enable Logging: Check this box to log ISLC activity, which can be useful for troubleshooting.
Additional Tips for Using ISLC
- Clear Standby List Before Gaming: Doing so can boost performance and minimize stuttering.
- Keep ISLC Up to Date: Ensure you're using the latest version of ISLC to take advantage of potential performance improvements.
By implementing these recommended settings and tips, you'll be able to optimize your PC's performance and significantly reduce memory leaks and stuttering issues, allowing for a smoother gaming experience. Remember to adjust the settings according to your system's RAM capacity to achieve the best results.
5. Full-screen Optimizations & High DPI
Disabling fullscreen optimizations and adjusting high DPI settings can help improve game performance on Windows 10 and Windows 11. Here's how:
- Right-click on your game's executable file and select Properties.
- Navigate to the Compatibility tab.
- Check the box for Disable fullscreen optimizations
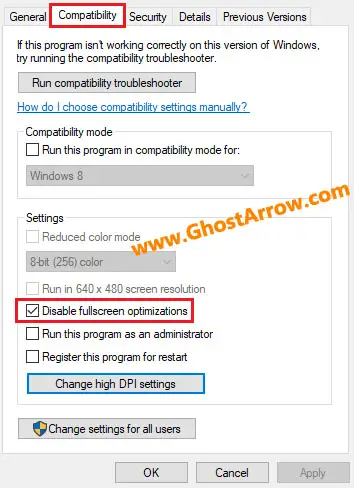
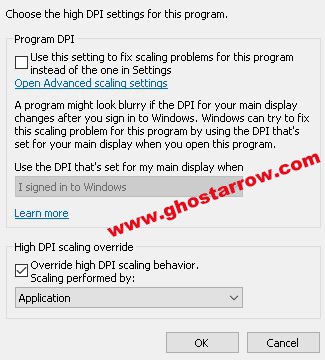
- Then, click on Change high DPI settings and check the box for Override high DPI scaling behavior. Then, select Application from the dropdown menu and click OK.
- Click Apply and OK to save your changes.
6. Power Options
Adjusting your power settings can also help boost gaming performance for desktop PC and laptop users. Follow these steps:
- Open the Control Panel: Press the Win + X keys on your keyboard and select Control Panel from the context menu.
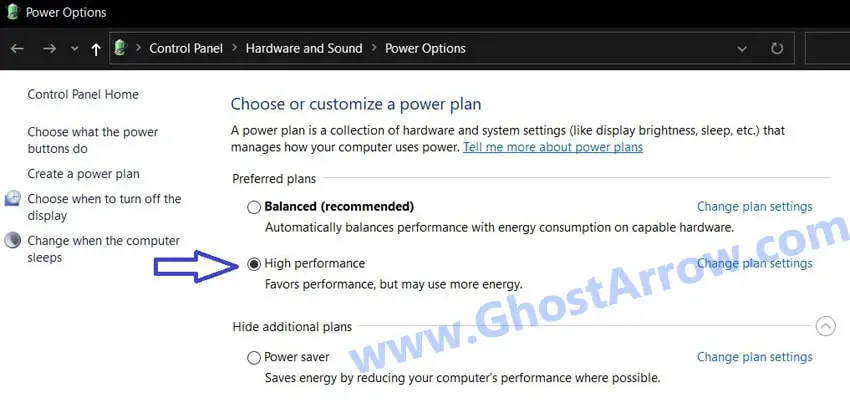
- Navigate to Power Options: In the Control Panel, set the "View by" option to Category and click on System and Security. Then, select Power Options.
- Choose a Power Plan: You'll see several power plans, including Balanced, Power Saver, and High Performance. Select High Performance to prioritize performance over energy efficiency.
- Customize the High-Performance Plan: To further optimize the settings, click on Change plan settings next to the High-Performance plan.
- Adjust Display and Sleep Settings: In the Edit Plan Settings window, set both "Turn off the display" and "Put the computer to sleep" options to "Never" to prevent interruptions during gaming sessions. Click on Save changes to apply these settings.
- Access Advanced Power Settings: Click on Change advanced power settings to open the Power Options - Advanced Settings window.
- Optimize Processor Power Management: Under the Processor power management settings, set the Minimum processor state and Maximum processor state to 100%. This ensures that your CPU operates at its full capacity when needed.
Additional Tips for Optimizing Power Options
- Enable Ultimate Performance: If you're using Windows 10 Pro or Enterprise, you can unlock the hidden "Ultimate Performance" power plan by running the following command in the Command Prompt (with administrator privileges): powercfg /setactive e9a42b02-d5df-448d-aa00-03f14749eb61
- Keep Your Laptop Plugged In: If you're gaming on a laptop, ensure it's plugged into a power source to maximize performance. Most laptops automatically reduce performance when running on battery power to conserve energy.
By following these steps and tips, you'll optimize your PC's power settings for gaming, allowing you to fully utilize your system's performance potential and enjoy a smoother gaming experience. Remember that using high-performance settings may result in increased power consumption and decreased battery life on laptops, so consider your priorities when adjusting these settings.
7. Game Mode
Windows 10 and later versions come with a built-in feature called Game Mode, designed to optimize system performance and improve gaming experience. However, depending on your specific hardware and the games you play, enabling or disabling Game Mode might yield different results.
Why Enable Game Mode?
Enabling Game Mode can undoubtedly provide several benefits for gamers:
- Improved Performance: In many cases, enabling Game Mode can enhance overall gaming performance by prioritizing system resources for the game you're playing, ensuring a smoother experience.
- Reduced Background Interference: Game Mode helps minimize the impact of background processes and applications, allowing you to focus on your game without distractions or slowdowns.
- Better Gaming Experience: With Game Mode enabled, you might notice improved frame rates, reduced input lag, and a more stable gaming experience, particularly on less powerful systems.
Why Disable Game Mode?
On the other hand, disabling Game Mode might be a better option in some situations:
- Compatibility Issues: Certain games or applications might not work well with Game Mode, resulting in lower performance or even crashes. In these instances, disabling Game Mode can resolve compatibility issues.
- High-End Systems: If you have an extremely powerful system, the benefits of Game Mode might be negligible or even counterproductive. Disabling Game Mode can allow your hardware to perform at its full potential without any restrictions.
- User Preference: Some users might simply prefer to manage their system resources and settings manually, in which case disabling Game Mode can grant more control over the gaming experience.
How to Enable/Disable Game Mode
To enable or disable Game Mode, follow these steps:
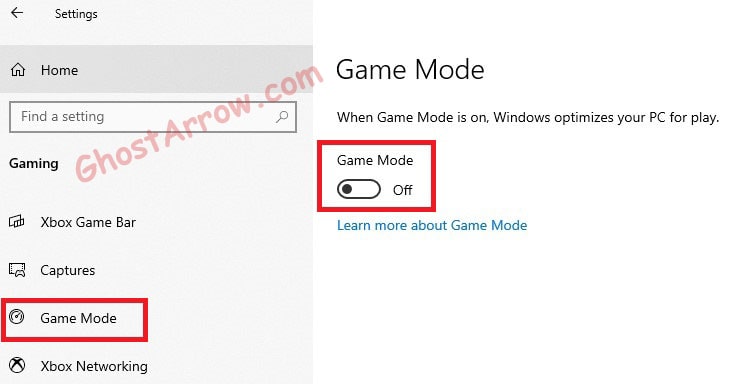
- Press Win + I to open the Settings app.
- Navigate to Gaming and then click on Game Mode.
- Toggle the switch under Game Mode to enable or disable the feature.
In conclusion, whether to enable or disable Game Mode depends on your specific system, the games you play, and your personal preferences. It's essential to experiment with both options to determine which setting provides the best performance and gaming experience for your unique situation. Remember to use Game Mode as a tool in conjunction with other optimization techniques for the best results.
8. Disable Captures
Disabling captures can help reduce the overhead of background processes during gaming. To do this:
- Open Settings and navigate to Gaming.
- Click on Captures and toggle the switch for Record in the background while I'm playing a game to Off.
9. Disable Xbox Game Bar
The Xbox Game Bar can sometimes cause performance issues during gaming. To disable it:
- Open Settings and navigate to Gaming.
- Click on Xbox Game Bar and toggle the switch to Off.
10. Disable In-Game Overlays
In-game overlays from applications like Steam, NVIDIA, and Discord can sometimes cause performance issues. To disable these overlays:
- Steam: Open Steam, click on Settings, navigate to In-Game, and uncheck the box for Enable the Steam Overlay while in-game.
- NVIDIA: Open the NVIDIA GeForce Experience, click on Settings (gear icon), and toggle the switch for In-Game Overlay to Off.
- Discord: Open Discord, click on User Settings (gear icon), navigate to Game Overlay, and toggle the switch for Enable in-game overlay to Off.
11. GPU Scheduling
Enabling GPU scheduling in Windows can potentially improve gaming performance. To enable this feature:
- Open Settings and navigate to System.
- Click on Display and scroll down to Graphics settings.
- Toggle the switch for Hardware-accelerated GPU scheduling to On.

12. Windows Graphics Settings
Optimizing Windows Graphics Settings can have a significant impact on your gaming experience, especially for laptop users. By setting your graphics settings to High Performance, you can force your system to utilize the dedicated GPU at its highest potential, ultimately providing a performance boost on your PC and enhancing your gaming performance.
The Benefits of High-Performance Mode
High-Performance Mode offers several notable advantages for gamers:
- Maximized Dedicated GPU Usage: Setting your graphics settings to High Performance ensures that your dedicated GPU is fully utilized, providing optimal gaming performance.
- Greater Impact for Laptop Users: Laptop users can particularly benefit from High Performance mode, as many laptops come with both integrated and dedicated GPUs. Enabling High Performance mode guarantees that the more powerful dedicated GPU is used for gaming, resulting in a smoother experience.
- Improved Game Stability: High Performance mode can also contribute to increased game stability and reduced stuttering or frame drops, providing a more enjoyable gaming experience.
How to Set Windows Graphics Settings to High Performance
To configure your Windows Graphics Settings for High Performance, follow these simple steps:
- Press the Start key and open the Settings menu.
- Click on System and then navigate to the Display tab.
- Scroll down and click on Graphics settings.
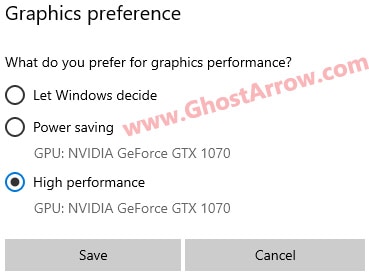
- Under Choose an app to set preference, select Desktop app from the dropdown menu, and then click on Browse.
- Locate the game's executable file (usually found in the game's installation folder) and click on Add.
- After adding the game, click on Options.
- Choose High performance and click on Save.
To sum up, adjusting your Windows Graphics Settings to High Performance mode can provide a substantial performance boost, particularly for laptop users. By leveraging your dedicated GPU to its fullest potential, you can enjoy a more stable, smooth, and visually appealing gaming experience. Remember that this setting works best in combination with other optimization techniques, so be sure to explore additional ways to boost your PC's performance for gaming.
13. Windows Performance Options
Adjusting Windows Performance Options can make a significant difference in your gaming experience, especially for low-end and mid-range PCs. While high-end PCs might not experience a substantial impact, optimizing these settings can still contribute to a smoother experience. Here's how to tweak your Windows Performance Options for optimal gaming:
Steps to Customize Windows Performance Options
- Press Win + R on your keyboard, which opens the Run dialog box.
- Type sysdm.cpl in the Run box and hit Enter.
- Navigate to the Advanced tab in the System Properties window.
- Locate the Performance section and click on the Settings button, opening the Performance Options window.
- Choose the Custom option.
- Deselect all options, except for the following two:
- Show thumbnails instead of icons: By displaying image and file thumbnails, this setting improves file browsing efficiency and allows you to locate files more quickly.
- Smooth edges of screen fonts: This setting refines the appearance of text on your screen, making it more legible by smoothing font edges.
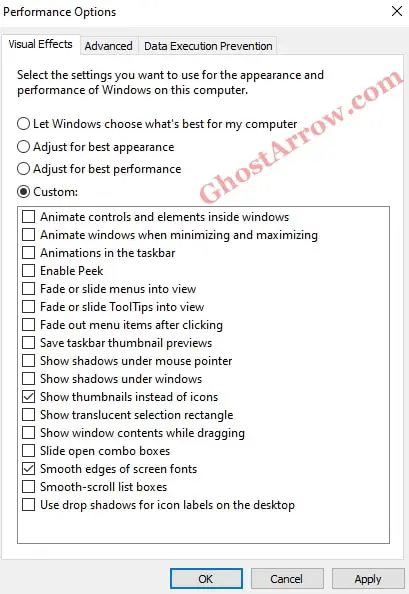
- Click Apply and then OK to save your changes and close the window.
14. Maximum Number of Logical Processors
Ensuring your PC is utilizing the maximum number of logical processors can help improve performance. To do this:
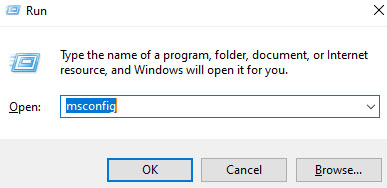
- Press Windows + R keys.
- Type msconfig into the Run dialog box
- Hit the OK button.
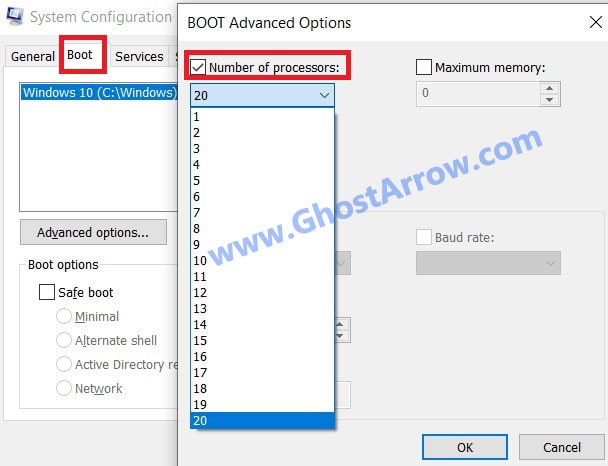
- Navigate to the Boot tab.
- Locate the section for your operating system and click on it.
- Click on the "Advanced options" button to access additional settings.
- Look for the "Number of processors" option and checkmark the box next to it.
- Select the highest number of processors available from the dropdown menu.
- Click OK to save the changes.
- Restart your PC to apply the new processor configuration.
15. Process Lasso - High CPU Usage Fix
Process Lasso is a fantastic tool for optimizing gaming performance by limiting CPU usage and addressing high CPU utilization issues. To harness its full potential, follow these steps:
Steps to Limit CPU Usage with Best Process Lasso Settings
- Download and install Process Lasso from the official website.
- Launch Process Lasso and let it run in the background.
- Start your game and wait for it to load completely.
- Press Alt + Tab to switch back to Process Lasso while keeping the game running.
- Find the game's .exe file in the list of processes.
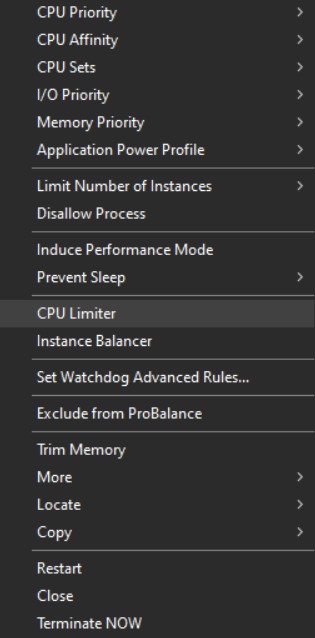
- Right-click on the .exe file and select CPU Limiter.
- Set the When CPU use is value to 98%, the Reduce by this many CPU cores value to 1, and the For a period of value to 1.
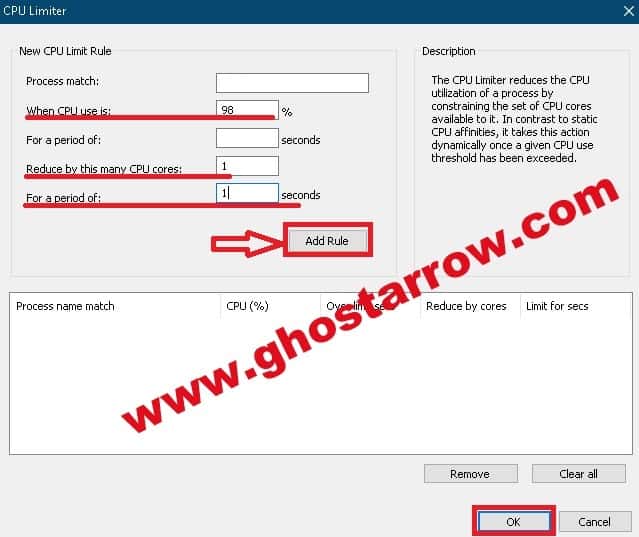
- Click Add Rule and minimize the tool.
Additionally, consider these optimal Process Lasso settings for enhanced gaming performance:
- Enable Performance Mode: Activating this setting allows Process Lasso to aggressively optimize performance.
- Enable ProBalance: This intelligently balances CPU and disk usage, ultimately boosting overall performance.
- Set CPU affinity for games: By specifying CPU cores for games, this setting can improve performance and reduce stuttering.
- Disable background services: Stopping unnecessary background services frees up CPU resources for gaming.
- Use the Process Lasso scheduler: This enables fine-tuning of the CPU scheduler to enhance performance for specific games.
Keep in mind that to get a performance boost on your PC for gaming, the best Process Lasso settings may vary depending on your system and games. Experimenting with different configurations can help you discover what works best for your unique setup.
16. Optimize Your Discord
Optimizing Discord can improve system performance during gaming. To do this:
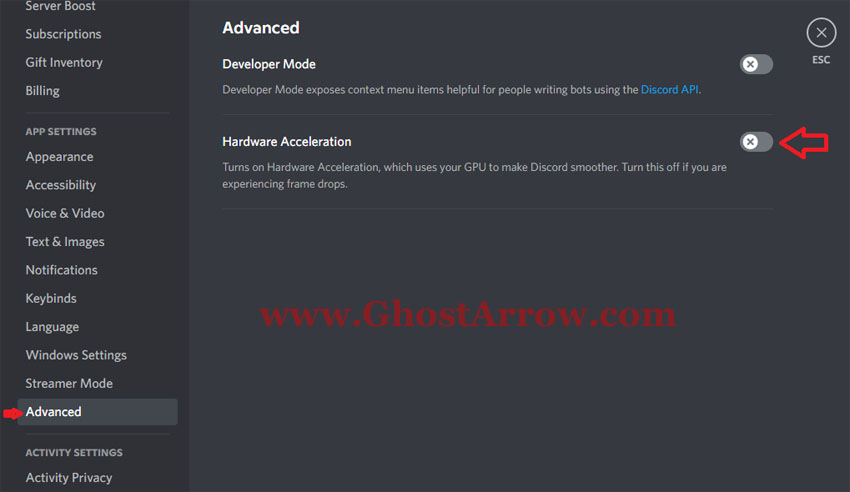
- Open Discord, click on User Settings (gear icon), and navigate to Appearance.
- Enable Hardware Acceleration if it's disabled, or disable it if it's enabled.
17. Optimize Your Google Chrome
Optimizing Google Chrome can also help improve gaming performance. Here's how:
- Open Google Chrome, click on the Menu (three-dot icon), and navigate to Settings.
- Then, click on System.
- After that, turn off the Use hardware acceleration when available to match your preference.
18. Background Applications
Closing unnecessary background processes can free up system resources for gaming. To close background processes and boost your PC performance for gaming:
- Press Ctrl + Shift + Esc to open the Task Manager.
- Navigate to the Processes tab and close any unneeded applications.
19. Increase Priority
Increasing the priority of your game's process can help improve performance. To do this:
- Press Ctrl + Shift + Esc to open the Task Manager.
- Right-click on your game's process and select Go to details.
- Right-click on the process again, hover over Set priority, and choose High or Above normal.
20. Cleaning Temporary Files
Clearing temporary files is a crucial step in optimizing your computer's performance, as these files can accumulate over time and take up valuable storage space. Follow these detailed steps to clean the temporary files stored in various locations:
- First, press the Windows key + R to open the Run dialog box.
- Type %temp% in the box and press Enter.
- Select all the files and folders in the directory that opens.
- Right-click and choose "Delete" to remove these files. You might not be able to delete some files that are in use, so skip them if necessary.
- Then, press Windows key + R again to open the Run dialog box.
- Type temp and press Enter.
- Similar to the previous step, select all files and folders in the directory.
- Right-click and select "Delete" to eliminate these files. If any files are in use, simply skip them.
- Next, open the Run dialog box by pressing Windows key + R.
- Type prefetch and hit Enter.
- In the directory that appears, select all files and folders.
- Right-click on the selected items and click "Delete" to remove them. As before, if some files are in use, leave them untouched.
- After that, locate the Recycle Bin icon on your desktop.
- Right-click on the icon and select "Empty Recycle Bin".
- Confirm the action to permanently delete all files in the Recycle Bin.
21. SSD
Installing your games on an SSD can significantly improve load times and overall performance. To do this, simply install your games on an SSD instead of a traditional HDD.
22. Optimize In-Game Graphics Settings
Lastly, to boost your PC performance for gaming, enhance your gaming experience and achieve a smoother performance, it is essential to optimize in-game graphics settings. Certain settings have a more significant impact on performance than others, and it's crucial to strike a balance between visual quality and performance. Let's discuss some key settings to consider.
Always play games in Fullscreen mode rather than Windowed or Borderless modes. Fullscreen mode allows the game to fully utilize your system's resources, leading to better performance and fewer distractions.
Also, if you're struggling with low FPS and stuttering, consider reducing the game's resolution. Lowering the resolution can significantly improve performance, particularly on low-end or mid-range systems. Although the visual quality will be reduced, the resulting smoother gameplay may be worth the trade-off.
Some graphics settings, such as Volumetric Clouds, Shadows, Anti-Aliasing, and Ray Tracing, can significantly impact performance. Lowering these settings can lead to considerable performance improvements while maintaining acceptable visual quality. In particular, disable Ray Tracing, as it can drastically reduce frame rates and is not yet an optimized technique. Although Ray Tracing can provide stunning visuals, it is not worth the performance trade-off in most cases.
Most importantly, if your graphics card and game support NVIDIA DLSS (Deep Learning Super Sampling) or AMD FSR (FidelityFX Super Resolution), definitely enable these technologies. Set them to Balanced or Performance mode to achieve an optimal balance between visual quality and performance. These technologies use AI upscaling to deliver better frame rates without compromising image quality.
Conclusion: Boost PC Performance for Gaming
In conclusion, optimizing your PC for gaming can significantly improve FPS and overall performance. By following the tips and techniques outlined in this guide, you'll be well on your way to enjoying smoother, more enjoyable gaming experiences. Happy gaming!
Additionally, don't forget to check out our other game troubleshooting guides as well.
You Fail to give the biggest tweak for gaming - Delete unwanted processes and microsoft draconian software that start in the background. You cannot tell these are running by looking at task manager. you have to go into system configuration settings and manually disable everything you don't need which can be 80 to 100 or so processes and services. This takes days to do and lots of time studying the processes and services. For a quick fix, use AME Wizard. It's a tool that guts all the crap out of your windows system including draconian services like windows update.
...This was actually a really good guide. Props.
Bro, thx for the guide. I have being research on how I can boost my computer. Those vids on YouTube didn't really do anything to improve performance. My laptop has a GTX 1060 card and my graphics settings are limited since it can't really handle it. Now, I can run games at the maximum settings at over 60 frames. Thank you so much and keep doing these guides. These are really helpful.
Thanks for this guide, really very useful for my 4 year old laptop, it improved the performance slightly
I'm glad I could help.