
This comprehensive guide focuses on helping you increase FPS in Resident Evil 4 Remake, as well as fix performance issues such as low FPS, stuttering, frame rate drops, and freezing. By following the methods outlined in this article, you can optimize your gaming experience for smoother gameplay.

How to Increase Performance in Resident Evil 4 Remake
To enhance the performance of Resident Evil 4 and fix common issues, apply the following methods:
1. Best RE4 Graphics Settings for Performance
Are you struggling with performance issues while playing Resident Evil 4 (RE4)? Well, my fellow gamers, you're in the right place! Let's dive into the best graphics settings for performance and get your game running as smoothly as possible.
First off, Ray Tracing can be a real troublemaker, especially if you don't have a high-end graphics card like the NVIDIA RTX 4090 or 4080. What is Ray Tracing? It's a level of simulation for light reflection and refraction, and while it can make your game look stunning, it can also cause crashes (Fatal D3D Error), stuttering, and freezing. So, if your GPU isn't up to the task, go ahead and turn off Ray Tracing.
Now, let's talk about FidelityFX Super Resolution (FSR). This optimization of upscaling is great for high-resolution gaming, but it can sometimes make the graphics look blurry. Try setting FidelityFX Super Resolution 2 to Balanced or Quality mode and see how it affects your image quality and performance. If it still looks too blurry, feel free to disable FSR altogether.
Want to increase your FPS in 2K or 4K resolution without using FSR? Try setting your Image Quality to 80%. Sure, it'll decrease the image quality a bit, but it might just be the performance boost you need.
When it comes to Texture Quality, pay close attention to the "Expected Graphics Memory" indicator. If it turns red or orange, you could experience performance issues or serious bugs. Got a GPU with less than 4GB VRAM? Stick to Low Texture Quality to be safe.
Shadow Quality is another setting that can impact performance, especially on GPUs with limited VRAM. To avoid problems, consider lowering your Shadow Quality.
Volumetric Lighting can also be a real resource hog, so setting it to Off or Min is a wise choice.
And let's not forget about Hair Strands! While it might improve hair and fur quality, it's notorious for killing performance. Turn it off for a smoother experience.
For those rocking a GPU like the NVIDIA GTX 1050 Ti, GTX 1060, or GTX 1650, try playing in 900p (1600 x 900) resolution and FidelityFX Super Resolution 2 Balanced mode for solid performance. For those using a GPU with specifications equivalent to or lower than an NVIDIA GTX 1050, consider playing at 720p (1280 x 720) to achieve stable frame rates.
Additionally, cap your Frame Rate to 60 or 120 to fix sudden stutters, and turn off Vertical Synchronization (VSync) for a performance boost. If you notice screen tearing, you can always enable VSync.
Experiencing slow-motion cutscenes? Change the Cinematics Resolution from 4K to Full HD to solve the issue.
By tweaking these settings, you should be well on your way to enjoying Resident Evil 4 with optimized performance.
2. Updating Graphics Drivers
Before you step into Leon S. Kennedy's shoes, let's make sure your graphics drivers are up to date, so you can experience the game in all its spine-chilling glory. Did you know that there are Resident Evil 4 specific drivers available for NVIDIA, AMD, and Intel Iris? That's right! And updating them could make a world of difference in your gameplay.
Now, you might be wondering, "How do I update my graphics drivers?" Don't worry, my friend. I've got you covered! Let's walk through the process step-by-step, for each of the three major graphics card manufacturers: NVIDIA, AMD, and Intel Iris.
NVIDIA:
- First things first, head on over to the NVIDIA GeForce Experience website (https://www.nvidia.com/en-us/geforce/geforce-experience/) and download the software. It's like having a personal gaming assistant on your PC!
- Once you've installed GeForce Experience, launch it and sign in or create an account.
- Now, click on the "Drivers" tab. This is where the magic happens!
- See that "Check for Updates" button? Give it a click, and GeForce Experience will scour the internet for the latest and greatest driver specific to your GPU and, of course, Resident Evil 4 Remake.
- Finally, click "Express Installation" to let the software do its thing. Easy as pie, right?
AMD:
- For you Radeon users out there, let's get you set up with the AMD Radeon Software. Visit the official AMD website (https://www.amd.com/en/support) to get started.
- Use the dropdown menus to select your GPU series and model, then click "Submit" to find the appropriate driver.
- Once you've found the right driver, download it and follow the installation prompts. It's like assembling a puzzle – you know, the kind that doesn't involve zombies trying to eat you.
- After installation, open the AMD Radeon Software and click on the "Home" tab.
- In the "Software & Drivers" section, click "Check for Updates" and let the software find the optimal Resident Evil 4 Remake driver for your GPU. Then, simply install it and you're good to go!
Intel Iris:
- For those sporting an Intel Iris GPU, let's get your drivers updated with the Intel Driver & Support Assistant. Visit the official Intel website (https://www.intel.com/content/www/us/en/support/detect.html) to download the tool.
- Install the software, and once it's up and running, it will automatically detect your GPU and search for updates. It's like having a zombie detector, but for drivers!
- If there's a newer driver available, the tool will provide you with a download link. Simply follow the installation prompts, and you'll be one step closer to your Resident Evil 4 Remake adventure.
3. Best NVIDIA Control Panel Settings for RE4
Hey NVIDIA users, it's time to take your Resident Evil 4 experience to the next level! So, you've updated your drivers, but did you know that tweaking your NVIDIA Control Panel settings can give you even better performance and visuals? That's right – it's like finding a secret weapon to help you take down those pesky zombies.
Let's dive into the best NVIDIA Control Panel settings for the Resident Evil 4 Remake. Remember, these are just suggestions, so feel free to experiment and find what works best for your rig!
- Open NVIDIA Control Panel: To kick things off, right-click on your desktop and select "NVIDIA Control Panel" from the context menu. Welcome to the command center!
- Manage 3D settings: In the left-hand menu, click on "Manage 3D settings" This is where the real fun begins.
- Select Resident Evil 4 Remake: Under the "Program Settings" tab, click "Add" and choose Resident Evil 4 from the list of programs. If you don't see it there, you might need to browse and locate the re4.exe file manually.
- Power management mode: Set this to "Prefer maximum performance". You want your GPU running at full steam while slaying those zombies, right?
- Texture filtering - Quality: Change this setting to "High performance". It's like turning up the heat on your frying pan, so you can cook those zombies faster!
- Vertical sync: Turn this off. This will help reduce input lag, ensuring that you're always one step ahead of those undead monstrosities.
- Threaded optimization: Set this to "On." It's like giving your GPU a team of helpers, so it can handle the game's demanding visuals with ease.
- Triple buffering: This one's optional. Turning it on may improve your gaming experience if you're experiencing screen tearing, but it could also introduce a bit of input lag. Test it out and see what works best for you!
- Maximum pre-rendered frames: Set this to "1." It's like prepping your ammo in advance, so you're always ready for the next zombie encounter.
Once you've made all these changes, click "Apply" to save your settings. Remember, every system is different, so feel free to tweak these settings until you find the perfect balance between performance and visuals.
4. Best AMD Control Panel Settings for RE4
Hey there, AMD users! We haven't forgotten about you. So, you're all set with the latest drivers, but what about optimizing your AMD Control Panel settings for Resident Evil 4 Remake?
Just like with NVIDIA, the right settings can help you strike the perfect balance between performance and visuals. Let's jump right into the best AMD Control Panel settings for the game, so you can vanquish those zombies with style!
- Open AMD Radeon Software: Right-click on your desktop and select "AMD Radeon Software" from the context menu. Welcome to your AMD command center!
- Gaming tab: Click on the "Gaming" tab at the top. It's time to gear up for some zombie slaying!
- Add Resident Evil 4 Remake: Click "Add a Game" and browse to locate the Resident Evil 4 Remake's .exe file. Now, we're ready to dive into those settings!
- Radeon Anti-Lag: Turn this feature on. It's like giving your reflexes a boost, so you can stay one step ahead of the undead horde.
- Radeon Chill: This one's optional, but it can help keep your GPU cool while you're playing. Enable it and set the minimum and maximum FPS based on your monitor's refresh rate and your performance preferences.
- Vertical Refresh: Turn this off to reduce input lag. You'll want your reactions to be as sharp as Leon's knife when those zombies come at you!
- Texture Filtering Quality: Set this to "Performance." It's like trading a little bit of visual flair for a smoother gameplay experience.
- Surface Format Optimization: Enable this setting. Think of it as streamlining the way your GPU handles textures, so you can enjoy a more fluid game.
- Tessellation Mode: Set this to "Override application settings" and choose a lower tessellation level. It's like simplifying the geometry of the game world, making it easier for your GPU to handle.
- Wait for Vertical Refresh: Set this to "Always off" to disable VSync and reduce input lag. Just make sure your monitor can handle the higher frame rates without screen tearing.
Once you've made all these adjustments, be sure to click "Apply" to save your settings. Keep in mind that every system is unique, so feel free to play around with these settings to find the sweet spot for your rig.
5. Disabling Fullscreen Optimizations
Alright, enough with the excessive chumminess, let's roll up our sleeves and dive into the task at hand. Disabling fullscreen optimizations can be a helpful step in improving your RE4 experience. Here's how to disable this feature for the re4.exe file:
- Find the game's .exe file (re4.exe) on your PC. If you're using Steam, it's typically located in the "C:\Program Files (x86)\Steam\steamapps\common\RESIDENT EVIL 4 BIOHAZARD RE4\" folder.
- Once you've found the re4.exe file, right-click on it and select "Properties" from the context menu.
- In the Properties window, click on the "Compatibility" tab.
- Look for the "Disable fullscreen optimizations" checkbox and check it.
- Click "Apply" to save your changes, and then close the Properties window.
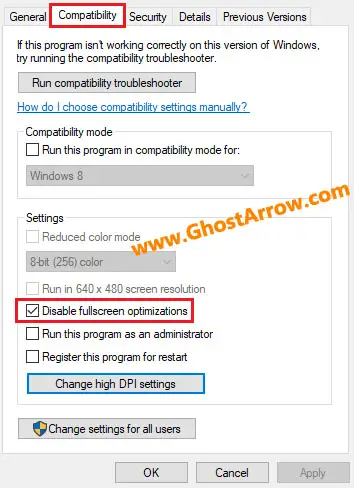
By following these steps, you may experience increased performance and reduced stuttering issues while playing Resident Evil 4 Remake.
6. Optimizing the Pagefile Size for Better Performance
The Windows Pagefile, also known as the virtual memory, acts as an extension of your computer's physical RAM. When your system runs out of RAM, the Pagefile steps in to provide additional memory, helping to prevent crashes and improve performance.
So, how can you optimize the Pagefile size for the best possible gaming experience in Resident Evil 4? Let's walk through the process step-by-step.
- Open System Properties: First, press the Windows key + Pause/Break key to open the System Properties window. You can also right-click on "This PC" or "My Computer" and select "Properties."
- Advanced system settings: In the System Properties window, click on "Advanced system settings" located on the left side. This will open the "System Properties" dialog with the "Advanced" tab selected.
- Performance Settings: Under the "Performance" section, click on the "Settings" button. This will open the "Performance Options" dialog.
- Advanced tab: In the Performance Options dialog, switch to the "Advanced" tab. This is where we'll be making changes to the Pagefile size.
- Change Pagefile size: Under the "Virtual memory" section, click on the "Change" button. This will open the "Virtual Memory" dialog.
- Customize Pagefile settings: In the Virtual Memory dialog, uncheck the "Automatically manage paging file size for all drives" option. This will enable you to set a custom Pagefile size.
- Select your drive: Choose the drive where your operating system is installed, usually the C: drive. It's essential to pick the right drive, just like choosing the best weapon for taking down zombies!
- Set a custom size: Click the "Custom size" radio button and enter an initial size and maximum size for your Pagefile. As a rule of thumb, the initial size should be 1.5 times your system's RAM, and the maximum size should be around 3 times the RAM. For example, if your system has 8 GB of RAM, you can set the initial size to 12288 MB (8 GB x 1.5) and the maximum size to 24576 MB (8 GB x 3).
- Apply and restart: Once you've entered the custom Pagefile sizes, click "Set," then "OK" to close the dialog boxes. You'll need to restart your computer for the changes to take effect. It's like rebooting your system to get ready for the next round of zombie-fighting action!
By increasing the Windows Pagefile size, you're giving your PC a little extra memory to work with, which could potentially improve the performance and stability of RE4 Remake. Don't forget, though, that every system is different, so feel free to experiment with different Pagefile sizes to find the sweet spot for your rig.
7. Optimizing Power Settings
Windows Power Options allow you to control your computer's power settings, balancing energy consumption and performance. By adjusting these settings, you can ensure that your system is running optimally, providing the best possible gaming experience in Resident Evil 4.
Follow these steps to optimize your Windows Power Options:
- Open Power Options: Press the Windows key and type "Power & sleep settings" in the search bar. Click on the search result to open the Power & sleep settings window.
- Access additional power settings: In the Power & sleep settings window, find the "Additional power settings" link on the right side and click on it. This will open the "Power Options" window.
- Choose a power plan: Windows offers several power plans, such as "Balanced," "Power saver," and "High performance." For gaming purposes, you'll want to select the "High performance" plan. This will ensure your computer is running at maximum capacity while playing Resident Evil 4 Remake. Click on the radio button next to "High performance" to activate this power plan.
- Customize advanced power settings (optional): If you'd like to dive deeper into the settings, you can customize the advanced power options. Click on the "Change plan settings" link next to the "High performance" plan. Then, click on the "Change advanced power settings" link in the next window.
- Adjust settings as needed: In the "Power Options - Advanced Settings" window, you can tweak various settings such as processor power management, display, and sleep options. You can expand each category and fine-tune the settings according to your preferences. Just be cautious, as some changes may have unintended consequences on your system's stability and performance. After making any adjustments, click "Apply" and then "OK" to save your changes.
8. Ensuring RE4 Utilizes Your Dedicated Graphics Card
In this section, we'll guide you through the process of making sure your game runs on the dedicated GPU instead of the integrated one, which could significantly boost performance on your laptop. Let's get started!
For those using a dual Nvidia / Intel GPU setup, follow these steps to ensure the game uses the dedicated Nvidia GPU:
- Update Intel integrated drivers: First, make sure you have the latest Intel integrated drivers installed. You can download them from the Intel Download Center.
- Restart your PC: After installing the latest drivers, reboot your PC to apply the changes.
- Access Nvidia Control Panel: Right-click on your desktop and select "NVIDIA Control Panel" from the context menu.
- Manage 3D settings: In the Nvidia Control Panel, click on "Manage 3D Settings" located on the left side.
- Select the game: Switch to the "Program Settings" tab and select Resident Evil 4 from the list of programs. If it's not listed, click "Add" and browse for the re4.exe to add it manually.
- Adjust Power Management Mode: Scroll down to the "Power Management Mode" option and change the setting from "Adaptive" to "Prefer Maximum Performance" or "High Performance Processor". Then click Apply and close the Nvidia Control Panel.
For those with a dual AMD "Switchable Graphics" GPU setup, follow these steps to ensure the game uses the dedicated AMD GPU:
- Open AMD Catalyst Control Center: Right-click on your desktop and select "AMD Catalyst Control Center" or "AMD Radeon Settings" from the context menu.
- Navigate to Switchable Graphics: Look for the "Switchable Graphics" settings, which could be located under "Power," "Performance," or a similar category.
- Select the game: In the "High Performance" section, find Resident Evil 4 in the list of applications.
- Apply changes: Click "Apply" to save your settings. Then close the control panel.
Additionally, you can also make similar adjustments in the Windows Graphics Settings to ensure the game runs on your dedicated GPU. To learn how to do this, you can check out this helpful guide. By following the steps in the guide, you'll be well on your way to maximizing your gaming performance and getting the most out of Resident Evil 4 Remake.
9. Freeing Up System Resources
Closing unnecessary apps and background processes can free up valuable system resources, such as CPU, memory, and disk usage, allowing your computer to focus on running Resident Evil 4 Remake smoothly. Here are some steps to help you close unnecessary apps and optimize your system for gaming:
- Start by closing any visible applications that you're not using while playing the game. This could include web browsers, messaging apps, or any other programs that consume system resources.
- Press Ctrl + Shift + Esc to open the Task Manager, a powerful tool that allows you to monitor and manage running processes on your computer.
- In the Task Manager, switch to the "Processes" tab. This tab displays a list of all currently running processes, along with their CPU, memory, and other resource usage.
- Look for processes that are consuming a significant amount of CPU, memory, or other resources. These could be background apps, update services, or other programs that you don't need while playing the game.
- Right-click on any unnecessary or resource-heavy processes and select "End task" to close them. Be cautious when doing this, as ending critical system processes could cause your computer to become unstable or crash. If you're unsure about a specific process, it's best to leave it alone or research it before taking any action.
- In the Task Manager, switch to the "Startup" tab. This tab displays a list of programs that automatically start when your computer boots up. Disabling unnecessary startup items can help reduce background processes and free up resources for gaming. To disable a startup item, right-click on it and select "Disable."
- Once you've closed unnecessary apps and background processes, close the Task Manager.
By closing unnecessary apps and background processes, you're freeing up valuable system resources that your computer can use to run Resident Evil 4 Remake more efficiently. It's always a good idea to keep your system as clean and optimized as possible for the best gaming experience.
Now that you've taken care of all steps, it's time to dive back into the captivating world of Resident Evil 4 Remake and enjoy the thrilling action without any performance hiccups. Good luck, and have fun!
FAQs
To adjust in-game settings, navigate to the game's options menu and look for the graphics menu. Lowering the resolution, disabling Ray Tracing, disabling Hair Strands and Volumetric Lighting, or reducing Texture Quality can improve performance.
Stuttering can be caused by various factors, including outdated drivers, background processes, or Windows settings. Follow the steps provided in the guide above to troubleshoot and resolve stuttering issues in Resident Evil 4.
Yes, Resident Evil 4 Remake supports various controllers, including Xbox and PlayStation controllers. Make sure your controller is properly configured in the game's settings menu for optimal gameplay experience.
Monitoring tools like HWMonitor or MSI Afterburner can help you track your system's temperature while gaming. Make sure your system is adequately cooled to prevent thermal throttling and potential damage.
Overclocking can potentially improve performance; however, it may also cause system instability or shorten the lifespan of your hardware. Proceed with caution and research your specific hardware before attempting to overclock.
Add Comment