

Best Way to Open WindowsApps Folder - So you've subscribed to the PC Game Pass, eagerly installed hit games like Starfield, Lies of P, PAYDAY 3, Cities: Skylines 2, and Age of Empires 4 via the Xbox app, but find yourself hitting a wall—quite literally.
It turns out the WindowsApps folder, where all these digital treasures reside, is no ordinary directory.
Microsoft has turned it into a fortress of sorts, effectively safeguarding it against easy access.
While the intention behind this restrictive approach primarily revolves around system security and stability, it often leaves tech enthusiasts and committed gamers puzzled and, quite frankly, a bit frustrated.
Does that spark questions in your mind? Such as, why is it so difficult to reach my own games and apps on my own computer?
And most importantly, how to circumvent these restrictions to open the WindowsApps folder? Let's unravel this mystery together.
The Quest for Authorization
Firstly, let's tackle the elephant in the room: why is the folder so hard to access? The answer is simple—security.
Microsoft wants to make sure that your system remains bulletproof against malware or accidental changes that could potentially bring your machine to its knees.
However, when you know what you're doing—or absolutely need to get in there for valid reasons like transferring game files or modifying an app—the pathway must be cleared.
Therefore, read on to discover the magical incantation, otherwise known as PowerShell commands, to gain rightful access!
Step 1: Invoke the Mighty PowerShell as an Admin
Begin your adventurous journey by right-clicking on the Windows Start icon at the bottom left of your screen.
You'll see a menu pop up, brimming with various options.
From these, you'll need to select Windows PowerShell (Admin) to run PowerShell with administrator privileges.
Remember, you're invoking the powers of administration, the keys to the kingdom.
So proceed with caution but also with a sense of daring wonder.
Step 2: The Command Spell to Rule Them All
With the PowerShell window now open, you're ready to unleash the command that will grant you the ownership of the coveted WindowsApps folder.
Type in the following command and hit Enter:
takeown /f "C:\Program Files\WindowsApps" /r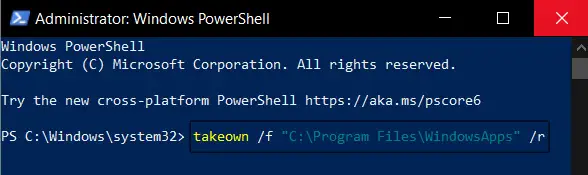
Notice the /f and /r flags. These mean you're taking ownership of the folder and all its subfolders recursively. Indeed, you're capturing the entire kingdom, not just the castle!
Moreover, if your applications or games are located in a different local disk (for instance, drive G:), adapt the command to match:
takeown /f "G:\WindowsApps" /rStep 3: The Moment of Triumph (Patience Required!)
Once you hit Enter, the PowerShell will start churning like a wizard concocting a complex potion.
This is not an instant process; in fact, it can take a few minutes depending on the number of subfolders and files.
It's much like a treasure hunt; it takes time to unearth the gems! Therefore, patience is the name of the game here. Keep an eye on the PowerShell window and wait.
The moment you've been waiting for will finally arrive: you'll see a SUCCESS message flash on the screen.
That's the golden ticket, the sign that you've been granted the hard-earned ability to access the WindowsApps folder. Your perseverance has paid off!
Extra Tips: Navigating the Labyrinth
Now that you're in, you might be wondering what all you can do.
While you should be cautious—don't delete anything unless you're certain of what it does—you now have the freedom to move apps between drives, make backups, or delve into game files for modding.
Conclusion: The Glory of Access
Surprisingly, accessing the WindowsApps folder is not rocket science.
It's a straightforward, yet highly guarded process designed to keep the uninitiated at bay.
However, with these steps, you've not just unlocked a folder; you've gained access to one of the most exclusive domains of your Windows operating system.
So go forth and explore, but remember—with great power comes great responsibility. Happy exploring!
Add Comment