
A guide to boost performance in Cyberpunk 2077 on PC - Cyberpunk 2077 has finally been released. If you are encountering poor performance in Cyberpunk 2077, this article will help you.
I provide you with this performance guide to help you tweak the game with your system. This guide aims to fix performance issues in Cyberpunk 2077 such as low frame rates, stuttering, freezing, fps drops, lagging.

How to make Cyberpunk 2077 run better
1) Graphics drivers
There are new graphics drivers that give major performance improvements for Cyberpunk 2077. Uninstall previous versions of graphics card drivers and install the latest one. How to completely uninstall graphics drivers?
You can get the latest graphics drivers from your graphics hardware manufacturer’s official website:
Game Ready for Cyberpunk 2077. This new Game Ready Driver provides the ultimate gaming experience for Cyberpunk 2077. In addition, this driver provides optimal day-1 support for the official launch of Minecraft with RTX for Windows 10.
Radeon Software Adrenalin 2020 Edition 20.12.1, Support For Cyberpunk 2077™
2) Nvidia Control Panel settings
- Open NVIDIA Control Panel
- Go to the Adjust image settings with preview tab.
- Click the “Use my preference emphasizing“
- Put the bar in Performance mode.
- Apply

- Click the Manage 3D settings
- Click the Program Settings
- Click the Add
- Select the Cyberpunk 2077 from the list, then click on the “Add Selected Program” button.
- Set the "Power management mode" to Prefer maximum performance
- Set the "Texture filtering - Quality" to High performance
- For laptop users: make sure you have selected the “High-performance NVIDIA processor” on preferred graphics processor.

- Apply and close the NVIDIA Control Panel.
3) AMD Radeon Adrenalin settings
- Open the AMD Radeon Software app by right-clicking on an empty area on your desktop.
- Click the Settings icon in the AMD Radeon Adrenalin 2020 Software.
- Go to the Graphics tab.
- Set the "Texture Filtering Quality" to Performance
- Then go to the General tab.
- Disable the "Instant Replay" and "In-Game Overlay"
4) SSD
SSD is recommended for Cyberpunk 2077. While an SSD does little for frame rates, it improves loading times compared to HDD.
Ensure Cyberpunk 2077 is installed on your SSD. If not, you can move the game's files to your SSD.
- Go to the Steam library
- Right-click on Cyberpunk 2077
- Click Properties
- Go to the Local Files tab.
- Click "Move Install Folder" button.
- Select the Steam library folder to move files to
- Click Move Folder
5) Windows 10 Graphics Settings
On some laptops, the game can detect the onboard graphics card instead of your dedicated GPU. Here's how to fix this problem in Windows 10:
- Enter graphics settings into Windows search box, then select Open once the results populate.
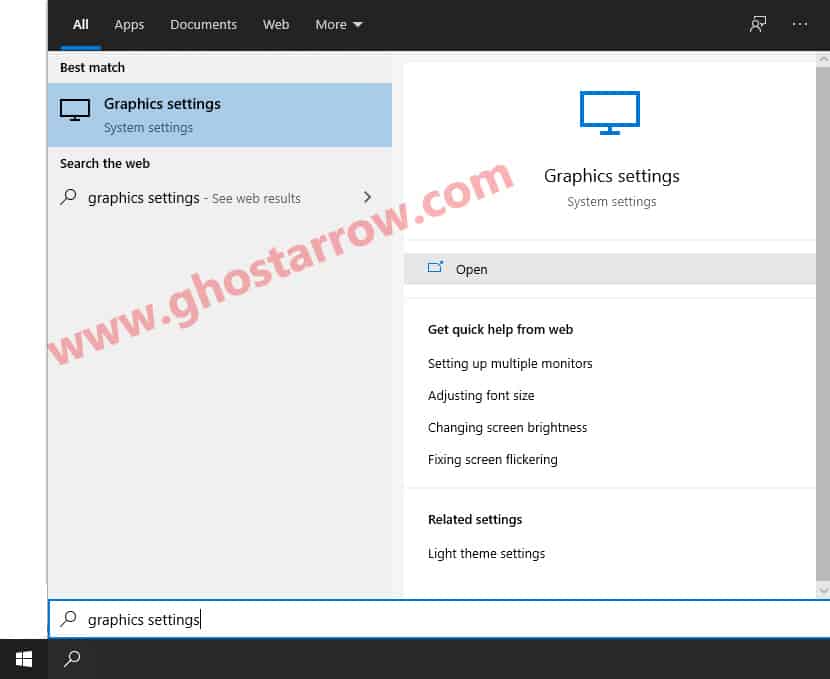
- Click the Browse button under “Graphics performance preference” in the window that appears.
- Select the exe application of Cyberpunk 2077 (...\SteamLibrary\steamapps\common\Cyberpunk 2077\bin\x64\Cyberpunk2077.exe)
- Then click Add
- After that click on the Options button.
- A new window will popup, select the High performance in the Graphics preference page.
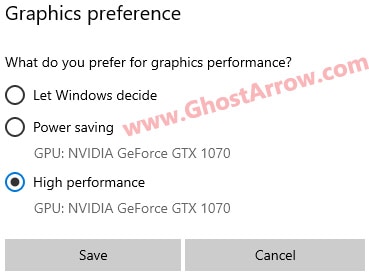
- Then click Save button.
- Restart your PC.
6) Fullscreen optimizations & high DPI settings
In Windows 10, full screen optimizations might not work properly and doesn't improve performance as expected.
- Go to the folder where Cyberpunk 2077 is installed
- Open the bin
- Open x64 folder
- Then right-click on Cyberpunk2077.exe file.
- Select Properties
- Go to the Compatibility tab.
- Tick the Disable fullscreen optimizations
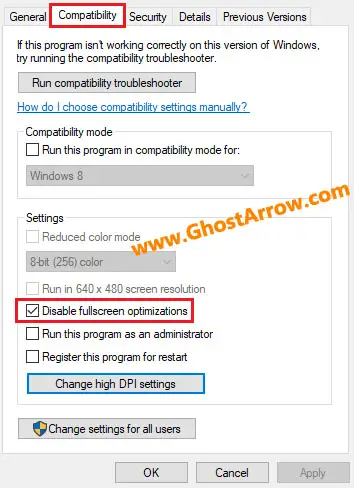
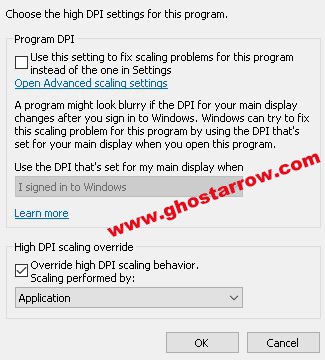
- Then click on the “Change high DPI settings” button.
- Under the “High DPI scaling override” section, tick the “Override high DPI scaling behavior“
- Use the “Scaling performed by:” drop-down menu and select the “Application”
- Click on the OK and again OK.
7) CPU Limiter - High CPU Usage Fix
If the CPU usage is around 100% while playing Cyberpunk 2077 on your PC, I will show you how to fix it with its detailed steps as follows:
- Download and install the Process Lasso
- Run the Process Lasso application.
- Launch the game.
- Go to the Process Lasso app and find the Cyberpunk2077.exe in “All processes” list.
- Right-click on the exe and select the CPU Limiter

- Set the “When CPU use is” to 98
- Set the “Reduce by this many CPU cores” to 1
- Below the “Reduce by this many CPU cores”, set the “For a period of” to 1
- Click on the Add Rule button.
- Finally click OK button

8) Best Graphics Settings for Performance
Settings > Graphics
| Minimum System | Performance | Ray Tracing | |
| Texture Quality | Low | High | High |
| Field of View | 70 | 80 | 80-100 |
| Film Grain | Off | Off | Off |
| Chromatic Aberration | Off | Off | Off |
| Depth of Field | Off | Off | Off |
| Lens Flare | Off | On | On |
| Motion Blur | Off | Off | Off |
| Contact Shadows | Off | Off | On |
| Improved Facial Lighting Geometry | Off | On | On |
| Anisotropy | 1 | 4 | 8 |
| Local Shadow Mesh Quality | Low | Medium | High |
| Local Shadow Quality | Off | Low | High |
| Cascaded Shadows Range | Low | Low | High |
| Cascaded Shadows Resolution | Low | Low | High |
| Distant Shadows Resolution | Low | High | High |
| Volumetric Fog Resolution | Low | Low | Ultra |
| Volumetric Cloud Quality | Off | Off | Ultra |
| Max Dynamic Decals | Low | High | Ultra |
| Screen Space Reflections Quality | Off | Off | High |
| Subsurface Scattering Quality | Low | High | High |
| Ambient Occlusion | Off | Low | High |
| Color Precision | Medium | Medium | High |
| Mirror Quality | Low | Medium | High |
| Level of Detail (LOD) | Low | Medium | High |
| Ray Tracing | Off | Off | On |
| Ray-Traced Reflections | Off | ||
| Ray-Traced Shadows | Off | ||
| Ray-Traced Lighting | Medium | ||
| DLSS | Off | Performance | Performance |
| Dynamic FidelityFX CAS | Off | Off | Off |
| Static FidelityFX CAS | Off | Off | Off |
Settings > Video
VSync: Off
Maximum FPS: Off
Windowed Mode: Fullscreen
Apply
9) Gameplay Settings
It is possible to increase performance in Cyberpunk 2077 by applying a few changes in the gameplay settings menu (Settings > Gameplay).
The first thing you should do is setting "Crowd Density" to Low. Also, you should enable the "Slow HDD Mode" if your hard drive is slow. Just set it to "On".
Don't forget to apply the changes!
10) Additional resources
- Cyber Engine Tweaks: https://github.com/yamashi/PerformanceOverhaulCyberpunk
Mod: https://www.nexusmods.com/cyberpunk2077/mods/107 - For AMD CPUs: https://www.reddit.com/r/Amd/comments/kbp0np/cyberpunk_2077_seems_to_ignore_smt_and_mostly/gfjf1vo/?utm_source=reddit&utm_medium=web2x&context=3
&
https://www.reddit.com/r/pcgaming/comments/kbsywg/cyberpunk_2077_used_an_intel_c_compiler_which/gfknein/?utm_source=reddit&utm_medium=web2x&context=3 - Edit your memory_pool_budgets.csv config file to unlock your Cyberpunk 2077 memory pool: https://www.reddit.com/r/pcgaming/comments/kcka6t/unlock_your_cyberpunk_2077_memory_pool_budget/
&
https://www.reddit.com/r/cyberpunkgame/comments/kccabx/hey_cd_projekt_red_i_think_you_shipped_the_wrong/
For more info, you can check out my PC optimization guide.
May want to be aware, setting the Crowd Density to Low has been found to be one of the causes of the continual drop in overall performance after playing the game for some time. It's a pretty common problem and someone posted a mod on Nexusmods that attempts to mitigate the issue.
Apparently, setting the crowd density to High is the only way to fully avoid this issue, but then you'll obviously have performance issues on lower end hardware.
Thanks. Got me from 30 ish to mid 40s fps on 1070ti and 3600.
Launch day; I see that I was not the only person dealing with no working fullscreen on launch:
https://www.gog.com/forum/cyberpunk_2077/fullscreen_borderless_mode_is_broken
However, after following Ghostarrow's recommendations, my system is running CP2077 in fullscreen. Excellent!