
Experiencing low frame rates, stuttering, hitching, or FPS drops in The Last of Us Part I on PC can be frustrating. This guide will provide you with a comprehensive set of solutions to boost your FPS and improve your overall gaming experience. Say goodbye to those annoying stutters and prepare for a smooth, immersive journey through the world of The Last of Us Part I.
There are several factors that can cause performance issues in The Last of Us Part I. Thankfully, we've compiled a list of proven methods to help you optimize your system and squeeze out every last bit of performance from your hardware. In this guide, you'll find actionable tips and tricks to increase FPS, fix stuttering, and improve your overall gaming experience.

Enhancing Performance in The Last of Us Part I
Performance issues in The Last of Us Part I can stem from various sources such as outdated graphics drivers, improper in-game settings, or even system-related bottlenecks. In the following sections, we will walk you through a series of steps and solutions to help you overcome these obstacles and get the most out of your gaming experience.
Update Your Graphics Drivers
Outdated graphics drivers can cause stuttering, low FPS, and other performance issues. Keeping your drivers up to date is essential for optimal gaming performance. Here's how to update your graphics drivers:
- Visit the official website of your GPU manufacturer (NVIDIA, AMD, or Intel).
- Search for the latest drivers for your specific GPU model.
- Download and install the latest driver following the provided instructions.
If you experience crashes or instability in The Last of Us Part I after updating your graphics drivers, you may want to try using Display Driver Uninstaller (DDU) to remove the current driver and then reinstall it. DDU is a powerful tool that completely removes all traces of graphics drivers, allowing for a clean installation of the latest driver version.
While it's rare, sometimes new drivers can cause compatibility issues. If you encounter problems after updating, try rolling back to a previous driver version.
Optimize NVIDIA Control Panel Settings
Adjusting the NVIDIA Control Panel settings can improve The Last of Us Part I's performance on systems with NVIDIA GPUs. Follow these steps to configure the best settings for performance:
- Right-click on your desktop and select "NVIDIA Control Panel".
- In the left sidebar, click on "3D Settings" and then "Manage 3D settings".
- In the "Global Settings" tab, you can adjust the settings for all games, but for optimal results, switch to the "Program Settings" tab to configure specific settings for The Last of Us Part I.
- Click on "Add" and locate the game's executable file. If you've recently played the game, it should appear in the dropdown menu.
- After selecting The Last of Us Part I, adjust the following settings:
- "Power management mode": Set this to "Prefer maximum performance" to prioritize performance over power savings.
- "Texture filtering - Quality": Set this to "High performance" for better performance without a significant impact on visual quality.
- "Threaded optimization": Enable this setting to allow the game to take advantage of multi-core CPUs.
- "Triple buffering": Disable this setting to reduce input lag.
- "Vertical sync": Set this to "Off" to uncap your frame rate, which can help increase FPS. However, turning off V-Sync may result in screen tearing.
- "Low Latency Mode": Set this to "On" to reduce input latency.
Feel free to experiment with other settings based on your system and preferences. Keep in mind that adjusting some settings may have a more significant impact on performance than others.
Additional note for laptop users: It is crucial to ensure that The Last of Us Part 1 is running on the dedicated NVIDIA GPU rather than the integrated GPU. To do this, follow these steps:
- In the NVIDIA Control Panel, under "3D Settings", click on "Manage 3D settings".
- Under the "Global Settings" tab, find the "Preferred graphics processor" setting.
- Select "High-performance NVIDIA processor" as the preferred graphics processor.
By making this change, laptop users can ensure that The Last of Us Part I utilizes the more powerful dedicated NVIDIA GPU, resulting in improved performance and a smoother gaming experience.
Power management mode, texture filtering quality, threaded optimization, and vertical sync are some of the settings that can have a considerable impact on performance in The Last of Us Part I.
It's essential to test different settings and find a balance that works best for your system. Start by adjusting the settings mentioned above and gradually tweak other settings as needed to achieve the desired balance between performance and visual quality.
Optimize AMD Radeon Settings
For those with AMD GPUs, adjusting the AMD Radeon Settings can also help improve performance in The Last of Us Part I. Here's how:
- Right-click on your desktop and select "AMD Radeon Settings" or "AMD Radeon Software".
- Navigate to "Gaming" > "Global Settings".
- Customize settings for optimal performance based on your system's capabilities. For example, set "Anti-aliasing Mode" to "Use application settings", "Texture Filtering Quality" to "Performance", and "Surface Format Optimization" to "Enabled".
- Adjust other settings like "Tessellation Mode" and "Wait for Vertical Refresh" based on your system and preferences.
Adjust In-Game Graphics Settings
The Last of Us Part I is a VRAM-hungry game, and it appears to be a poorly optimized console port on PC. At least until an optimization update arrives, this situation remains unchanged. To access the graphics settings, navigate to Options > Graphics in the game menu.
Firstly, before adjusting the graphics settings for The Last of Us Part I, players must ensure they wait for the "Building Shaders" process to complete. This step is crucial, as the game compiles shaders in the background to improve the overall visual quality and performance. Check the progress percentage in the lower right corner of the menu screen. Be aware that this process can be time-consuming, so be prepared to wait.
Playing the game with High and Ultra Graphics Presets and high resolutions is quite challenging for many graphics cards and CPUs. For instance, in the Geometry Settings section, keeping Draw Distance at the lowest level is essential, as it consumes both GPU and CPU resources excessively. Players can also consider lowering Dynamic Objects Level of Detail, Characters Level of Detail, and Environments Level of Detail.
In the Texture Settings section, it is worth mentioning that Dynamic Objects Texture Quality, Characters Texture Quality, Environments Texture Quality, and Visual Effects Texture Quality all use a considerable amount of VRAM. Most importantly, the Texture Sampling Quality setting puts a significant load on the GPU.
In the Lighting Settings section, Directional Shadow Resolution heavily uses both the graphics card and VRAM, so it is recommended to set it to Low. Moreover, if Ambient Shadow Quality being on or off is not a significant concern for the players, they should consider turning it off.
For The Last of Us Part I players with GPUs like NVIDIA GTX 1050, GTX 1050 Ti, GTX 1060, or GTX 1650, it is advisable to keep graphics settings as low as possible and play at lower resolutions. While doing so, players should also monitor CPU usage to avoid bottleneck issues. The game becomes playable at 1600x900 or 720p Display Resolution with Low settings (with Low-Medium Texture settings), turning off FSR (FSR 2 may provide a better performance, but the quality will be muddy).
With NVIDIA RTX 3060/3070 or better GPUs, it is possible to play the game smoothly with DLSS Balanced and High graphics settings. However, playing The Last of Us Part I smoothly at 2K and 4K resolutions is currently challenging, as stuttering issues are widespread.
In conclusion, players should be patient while optimizing the game's graphics settings and remember that The Last of Us PC best graphics settings may vary based on their hardware. By tweaking these settings, they can achieve a more enjoyable gaming experience.
Note: I will continue to share the best The Last of Us Part I PC graphics settings for performance in this section. It is evident that the game needs optimization, and I will keep updating this information as necessary. Stay tuned for further updates.
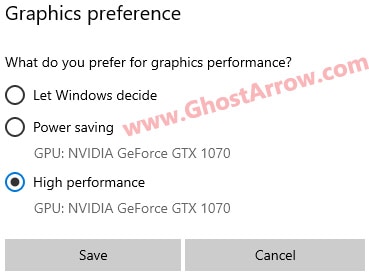
Ensure Game Runs on Dedicated GPU
Make sure The Last of Us Part I is running on your dedicated GPU by adjusting your Windows Graphics Settings:
- Right-click on your desktop and select "Display settings".
- Scroll down and click on "Graphics settings".
- Click on "Browse" and find The Last of Us Part I's executable file.
- Once added, click on the game and select "Options".
- Choose "High performance" and click "Save".
Optimize Windows Power Settings
Optimizing your Windows power settings can have a significant impact on the performance of The Last of Us Part I. By default, Windows may be set to a balanced or power-saving mode, which can limit the performance of your CPU and GPU. Changing your power settings to "High performance" mode can help you get the most out of your hardware and provide a smoother gaming experience.
To optimize your Windows power settings, follow these steps:
- Right-click on the battery icon in the system tray (bottom-right corner) and select "Power Options". Alternatively, open the Start menu, type "Power & sleep settings" and press Enter.
- In the "Power & sleep settings" window, click on "Additional power settings" on the right side.
- Select the "High performance" or " Ultimate performance (if available)" power plan. If it's not visible, click on "Show additional plans" to reveal it.
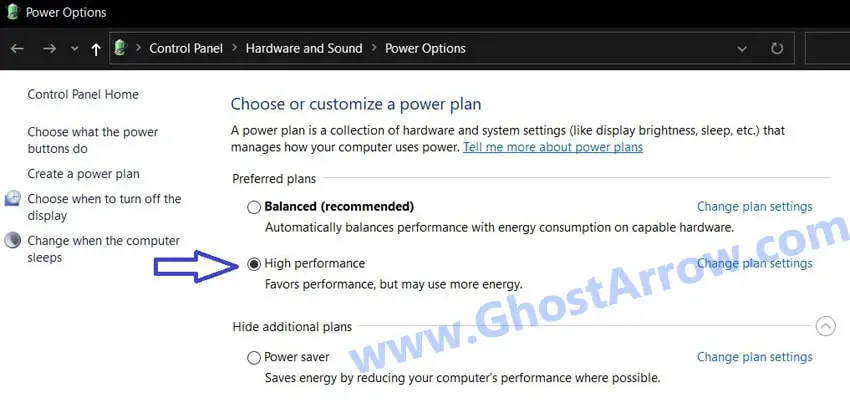
By enabling "High performance" mode, your system will prioritize performance over power savings, allowing your CPU and GPU to operate at their full potential. This can result in increased FPS and reduced stuttering in The Last of Us Part 1.
Advantages:
- Higher frame rates and a smoother gaming experience.
- Reduced stuttering and hitching caused by power-saving features.
- Improved performance in other applications and tasks.
Disadvantages:
- Increased power consumption, which can lead to shorter battery life for laptops.
- Higher system temperatures, which may require additional cooling solutions.
Generally, using "High performance" mode is safe and shouldn't cause any problems. However, it may result in increased power consumption and system temperatures. If you're using a laptop, be prepared for shorter battery life. If you notice any thermal issues, consider using a cooling pad or a well-ventilated area for your system.
It's a good idea to use "High performance" mode while gaming, as it can provide a better experience with higher frame rates and smoother gameplay. However, you may want to switch back to a balanced or power-saving mode when not gaming to conserve battery life and reduce system temperatures.
Use Process Lasso to Prevent High CPU Usage
Process Lasso is a powerful system utility that can help you optimize CPU usage and prevent high CPU usage in The Last of Us Part I. High CPU usage can lead to stuttering, hitching, and other performance issues, making the game less enjoyable. By using Process Lasso's CPU Limiter feature, you can limit the game's CPU usage and achieve a smoother gaming experience.
To use Process Lasso to prevent high CPU usage in The Last of Us Part I, follow these steps:
- Download and install Process Lasso from their official website.
- Run the Process Lasso application.
- Launch The Last of Us Part I.
- Go to the Process Lasso app and find The Last of Us Part I's exe file in the "All processes" list.
- Right-click on the exe and select "CPU Limiter".
- Set the "When CPU use is" to 98%.
- Set the "Reduce by this many CPU cores" to 1.
- Below the "Reduce by this many CPU cores", set the "For a period of" to 1 second.
- Click on the "Add Rule" button.
- Finally, click the "OK" button and play TLOU
By following these steps, you can effectively limit the CPU usage of The Last of Us Part I, preventing high CPU usage issues and ensuring a smoother gaming experience.
Generally, Process Lasso is safe to use and shouldn't cause any problems. However, if you notice any issues after using it, try adjusting the settings or uninstalling the application.
Install the Game on an SSD
Installing The Last of Us Part I on a solid-state drive (SSD) can significantly improve the game's performance, particularly in terms of loading times and asset streaming.
SSDs are much faster than traditional hard disk drives (HDDs), which can result in a smoother gaming experience with fewer performance hiccups. There are several benefits to installing The Last of Us Part I on an SSD.
Faster loading times: SSDs have much faster read and write speeds than HDDs, which means the game will load assets more quickly. This can result in shorter loading screens and faster transitions between in-game areas.
Reduced stuttering and hitching: The game's assets, such as textures and character models, are often streamed from the storage drive during gameplay. An SSD's faster read speeds can help prevent stuttering and hitching caused by slow asset loading.
Improved overall system performance: Installing the game on an SSD can also improve your computer's overall performance by reducing the strain on your HDD during gaming sessions.
Clean Temporary Windows Files
Cleaning temporary Windows files can help improve the performance of The Last of Us Part I, especially on low-end PCs. Temporary files can accumulate over time, taking up valuable storage space and potentially causing performance issues. By regularly cleaning these files, you can ensure a smoother gaming experience and maintain optimal system performance.
To clean temporary Windows files, follow these steps:
- Press the Windows key + R to open the Run dialog box.
- Type "temp" in the Run dialog box and press Enter. This will open the temporary files folder.
- Select all files and folders within the temporary files folder by pressing Ctrl + A.
- Right-click on the selected files and folders and choose "Delete". If you're prompted for administrator permission, click "Yes" or "Continue".
- Empty your Recycle Bin to permanently delete the temporary files.
Note: Some temporary files may be in use by the system or other applications and cannot be deleted. If you encounter any such files, simply skip them and continue with the deletion process.
In addition to the temporary files folder, you can also clean the "Windows Temp" folder:
- Press the Windows key + R to open the Run dialog box.
- Type "%temp%" in the Run dialog box and press Enter. This will open the "Windows Temp" folder.
- Repeat steps 3 to 5 from the previous section to delete the contents of the "Windows Temp" folder.
Cleaning temporary Windows files can free up storage space, reduce disk fragmentation, and contribute to better overall system performance. While this may not have a drastic impact on The Last of Us Part I's performance, it can still provide a noticeable improvement, particularly for low-end PCs.
Use Intelligent Standby List Cleaner
Intelligent Standby List Cleaner (ISLC) is a handy utility that can help improve the performance of The Last of Us PC by clearing the Windows standby memory and reducing input lag. Standby memory is a cache that stores frequently accessed data for quick retrieval, but in some cases, it can become full and cause performance issues, such as stuttering in games.
ISLC also offers a built-in timer resolution optimization feature, which can help reduce input lag and provide a smoother gaming experience.
How to Use Intelligent Standby List Cleaner
To use Intelligent Standby List Cleaner, follow these steps:
- Download ISLC from the official website and extract the contents of the ZIP file to a folder of your choice.
- Run the "Intelligent Standby List Cleaner ISLC.exe" file as an administrator.
- In the ISLC window, you will see two sliders: "The list size is at least" and "Free memory is lower than". Adjust these sliders according to your system's total memory. For example, if you have 16GB of RAM, set "The list size is at least" to 1024 MB and "Free memory is lower than" to 8192 MB.
- Check the box "Start ISLC minimized and auto-START monitoring" to have the utility start automatically when you launch your system.
- (Optional) Check the box "Enable custom timer resolution" and set the "Wanted timer resolution" to 0.50ms for further input lag reduction.
- Click on "Start" at the bottom of the window to enable ISLC monitoring.
By using ISLC, you can ensure that your system's standby memory is regularly cleared, potentially improving the performance of The Last of Us Part I and reducing stuttering caused by full standby memory.
Additional Suggestions
Oodle Decompression Library
Some players have shared potential solutions to performance issues in The Last of Us Part I on PC. A Steam user mentioned that the game was packaged with an incorrect version of the Oodle Decompression Library (ver2.9.6) instead of (ver2.9.5). They claim that installing Oodle Decompression Library 2.9.5 can instantly clear up any caching or performance issues with the game. Link: https://steamcommunity.com/app/1888930/discussions/0/3818529563396381516/
Similarly, a Reddit user also pointed out that the port uses a bugged version of Oodle, causing performance and shader building issues. They suggested replacing the DLL file in the game directory with a non-bugged version found in other games like Uncharted, FIFA 23, or Warframe. Link: https://www.reddit.com/r/thelastofus/comments/1250dn7/psa_for_tlou_p1_pc_port_uses_a_bugged_version_of/
Oodle decompression library 2.9.5 download: https://www.nexusmods.com/thelastofuspart1/mods/11
Please note that I have not personally tested these "Oodle Decompression Library" solutions, and I cannot take responsibility for any potential problems that may arise from attempting them. However, if you're experiencing performance issues and feel comfortable trying these suggestions, they might be worth exploring.
Fullscreen Optimizations
Disabling fullscreen optimizations for The Last of Us Part I's executable file can potentially help fix or reduce stuttering issues that occur when moving the mouse during gameplay.
Raw Mouse Input
Disabling Raw Mouse Input in the game settings may also help to fix stuttering issues when moving the mouse during gameplay.
Conclusion
In conclusion, optimizing your system and game settings can fix "The Last of Us stuttering" issue, significantly improve performance and increase FPS in The Last of Us Part I on PC. The methods covered in this guide include updating graphics drivers, optimizing control panel settings for both NVIDIA and AMD GPUs, adjusting in-game graphics settings, ensuring the game runs on a dedicated GPU, optimizing Windows power settings, using CPU limiters like Process Lasso, installing the game on an SSD, cleaning temporary Windows files, and using tools like ISLC. By implementing these solutions, you can enjoy a smoother, more enjoyable gaming experience.