Monster Hunter World has become so beloved after the release of the Iceborn DLC. MHW is a fun game, but due to performance problems in the game, most players get angry. So I made a guide to fix your performance issues in Monster Hunter World, such as freezing, low FPS, stuttering, fps drop, spikes, lagging.
There are 18 ways to improve your performance in Monster Hunter: World.
System Requirements for Running Monster Hunter World
| Minimum System Requirements | Recommended System Requirements | |
| CPU | Intel® Core™ i5-4460, 3.20GHz or AMD FX™-6300 | Intel® Core™ i7 3770 3.4GHz or Intel® Core™ i3 8350 4GHz or AMD Ryzen™ 5 1500X |
| GPU | NVIDIA® GeForce® GTX 760 or AMD Radeon™ R7 260x (VRAM 2GB) | NVIDIA® GeForce® GTX 1060 (VRAM 3GB) or AMD Radeon™ RX 570 (VRAM 4GB) |
| DirectX | DirectX 11 | DirectX 11 |
| RAM | 8 GB RAM | 8 GB RAM |
| Storage | 30 GB available space | 30 GB available space |
| OS | WINDOWS® 7, 8, 8.1, 10 (64-bit required) | WINDOWS® 7, 8, 8.1, 10 (64-bit required) |
1) Best Graphics Settings for Monster Hunter World
You can skip this step if you don’t want to change graphics settings. These High Performance graphics settings are for PCs which close to the minimum system requirements.
If you have a good PC, you can increase the settings slightly.
Go to in-game graphics options and make sure the settings are as follows.
Options > Display
| Screen Mode Settings | Full Screen |
| V-Sync | Off |
| Graphics Settings | Manual |
Options > Display > Advanced Graphics Settings
| High Performance | Performance | |
| Resolution Scaling | Low | Mid or High |
| Texture Quality | 256 | 512 |
| Ambient Occlusion | Off | Off |
| Volume Rendering Quality | Off | Off |
| Shadow Quality | Low | Low |
| Anti-Aliasing | Off | Off |
| LOD Bias | Low | Low |
| Max LOD Level | No Limit | No Limit |
| Foliage Sway | Off | Off |
| Subsurface Scattering | Off | Off |
| Screen Space Reflection | Off | Off |
| Anisotropic Filtering | Low | Low |
| Water Reflection | Off | Off |
| SH Diffuse Quality | Low | Low |
| Dynamic Range | 32-Bit | 32-Bit |
| Z-Prepass | On | On |
Apply changes and exit the game.
If you encounter screen tearing problem during the gameplay, you should enable the V-Sync. If you have a monitor with G-SYNC or FreeSync, you can activate them instead of Vsync.
2) Steam Launch Options
- Go to the list of games in the Steam library.
- Right-click the Monster Hunter World and click the Properties.
- Click the Set Launch Options in the General tab.
- Type or paste the following commands into the box in the incoming window.
-USEALLAVAILABLECORES -high
3) Update Your Graphics Drivers
You should keep your computer’s graphics drivers updated.
People who have an NVIDIA graphics card can download and install their new drivers here. If you think the current driver is degrading performance, you should rolling back to a previous driver update (398.36)
People who have an AMD graphics card can download and install their new drivers here.
4) NVIDIA Control Panel Settings
- Open NVIDIA Control Panel
- Go to the Adjust image settings with preview tab.
- Click the “Use my preference emphasizing“ (If you have a mid&high end pc, Let the 3D application decide)
- Put the bar in Performance mode.
- Apply

- Click the Manage 3D settings
- Click the Program Settings
- Click the Add
- Select the Monster Hunter World from the list, then click on the “Add Selected Program” button.
- After, make the following settings
Antialiasing - Mode: Off
Power management mode: Prefer maximum performance
Shader Cache: On
Texture filtering - Quality: High performance
Vertical sync: Off - If you have a notebook, make sure you have selected the “High-performance NVIDIA processor” on preferred graphics processor.

- Apply and close the NVIDIA Control Panel.
Effect of the “Power management mode” setting differs between GPUs. If these settings made your FPS worse, just set the “Power management mode” to “Optimal power“. After that, it will increase. You can test it.
5) AMD Radeon Settings
- Open the AMD Radeon Settings window.
- Click on the Gaming tab.
- Then click on Global Settings.
- Go to the Anti-aliasing mode, choose Override application settings.
- Click on the Anti-aliasing level, so make sure you have selected the 2X
- Go to the Anisotropic Filtering Mode and turn it on.
- Then, click on the Anisotropic Filtering Level, so make sure you have selected the 2X.
- Click on the Texture Filtering Quality and select the Performance.
- Now, click on the Wait for Vertical Refresh and select the Always off.
- Click on the Tessellation Mode and select the Override application settings.
- Finally, click on the Maximum Tessellation Level and select the 32x or lower.

6) Intelligent Standby List Cleaner
The “Intelligent standby list cleaner” application will monitor and clear the memory standby list when it is > 1000mb (1gb). It will help players to fix stutters in games.
- Download the Intelligent standby list cleaner
- Run the 7-zip file.
- Extract to a folder.
- Go to the that folder.
- Run the “Intelligent standby list cleaner ISLC” application.
- Check the “Start ISLC minimized and auto-Start monitoring”
- Also, check the “Launch ISLC on user logon”
- Now, click on the Start button
- Minimize

7) Full-screen Optimizations & High DPI in Windows 10

- Go to the folder where the game is installed.
(Steam Library > Right-click on Monster Hunter: World > Properties > LOCAL FILES > BROWSE LOCAL FILES) - Right-click on MonsterHunterWorld.exe
- Hit the Properties
- Tick “Disable full-screen optimizations” on the Compatibility tab.
- After that, click on the “Change high DPI settings” button.
- Under the “High DPI scaling override” section, tick the “Override high DPI scaling behavior“
- Use the “Scaling performed by:” drop-down menu and select the “Application”
- Click on the OK and again OK.

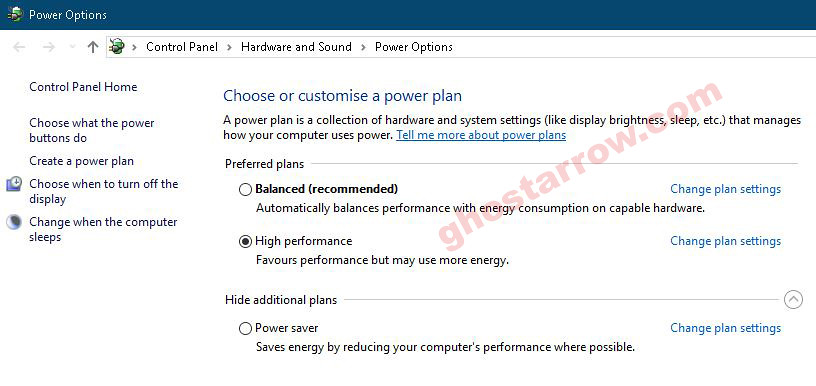
8) Power Options
If the CPU cooler is not enough, you can skip this setting. Processor temperature may increase by 5-6 degrees.

- Right-click the Windows icon on the bottom left.
- Click the Power Options
- Click the Additional power settings
- Select the High performance on the Preferred plans tab.
- After, click the Change plan settings link next to High performance.
- Tap on the Change advanced power settings
- Find Processor power management in the incoming list, click the + icon on the left side.
- Set Minimum processor state and Maximum processor state to 100%
- Click on the OK
9) Game Mode
- To turn off Windows 10 game mode, click the Start icon to bring up the Start menu. Then open the Settings.
- Click the Gaming
- On the Game Bar tab, set the “Record game clips, screenshots and broadcast using Game bar” to Off.
- On the Captures tab, set the “Record in the background while I’m playing a game” to Off.
- On the Game Mode tab, set the “Game Mode” to Off.
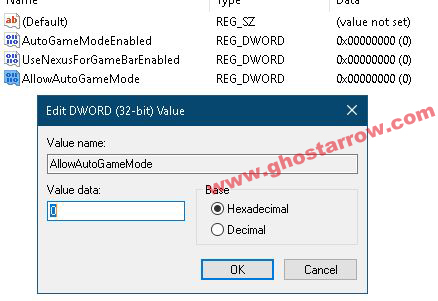
If you are using an older version of Windows 10, you may not see the Game Mode settings. In this case, you can configure the settings directly in the Registry.
- Press the Windows logo key and R key simultaneously on your keyboard.
- Type regedit
- Press the Enter key.
- The Registry Editor will open. In the left panel, Navigate to HKEY_CURRENT_USER\Software\Microsoft\GameBar
- Right-click inside the panel and select New
- Click on the DWORD (32-bit) Value

- Rename the New Key to AllowAutoGameMode
- Right-click on the AllowAutoGameMode
- Select the Modify…
- Set the “Value data” to 0

- Click on the OK button.
- Close the Registry Editor.
- Restart your PC.
10) Windows Performance Options
- Type performance in the search section of Windows, click to Adjust the appearance and performance of Windows from the results.
- Select the Adjust for best performance from the options in the Performance Options window that opens.
- Click OK

11) Cleaning Temporary Files
- Simultaneously press the Windows logo and R keys.
- Type %temp%
- Press Enter key.
- Delete everything in the Temp folder that opens. You can skip undeleted.
- Again, Simultaneously press the Windows logo and R keys.
- Type temp
- Press Enter key.
- Delete everything in the folder that opens.
- Again, Simultaneously press the Windows logo and R keys.
- Type prefetch
- Press Enter key.
- Delete everything in the Prefetch folder that opens.
Finally, empty the Recycle Bin
12) SSD
If you have a Solid-State Drive, I recommend that you install the game on the SSD or move the game files to the SSD.
13) Optimize Your Discord
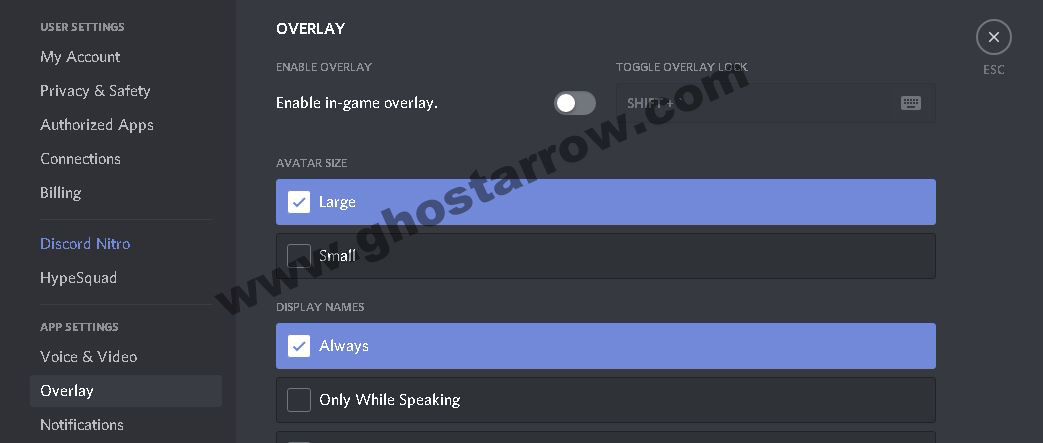
If you are using Discord, disable the Hardware Acceleration and in-game overlay.
- Open Discord
- Go to the User Settings
- Then, go to the Appearance tab.
- Uncheck the Hardware Acceleration.

- Go to the Overlay on App Settings tab.
- Make sure unchecked the “Enable in-game overlay”

14) Optimize Your Google Chrome
If you’re using Google Chrome, you’ll need to make this setting.

- Go to settings page in Chrome
- Click the Advanced
- Go to the System tab
- Finally, uncheck the “Continue running background apps when Google Chrome is closed”
15) Background Processes
You should close all unnecessary applications, such as Chrome, Spotify, OneDrive. Also, if the Discord is idle, you should quit Discord.
Also, you can use the CCleaner to go through your startup and scheduled tasks, and disable everything that you consider unnecessary.
And also, you should disable your Firewall/Antivirus while playing Monster Hunter World, such as Eset, Avast, BitDefender, AVG, Acronis Active Protection etc. Or add your Monster Hunter: World directory in the exceptions list in your antivirus software.
16) Increase The Priority
You need to adjust this setting every time you enter the game.
- Launch the game.
- Simultaneously press the ALT and TAB keys to minimize the game.
- Open the Task Manager
- Click on Details Tab
- In the list, find the MonsterHunterWorld.exe
- Right-click on MonsterHunterWorld.exe application and Set priority to High.
If you facing stuttering issue in the game after doing this, don’t do the High priority setting. Set it to Normal.
17) CPU Core Unparking - Reducing Stutter
Quick CPU (CPU core parking manager) is a program that stops windows from limiting your CPU power. Unparking cores of CPU allows games to have full access to your processor.
I've never heard of this program causing any problems. Nevertheless, you have all the responsibility!
- Download the Quick CPU
- Unzip and install it (x64 folder)
- Run the Quick CPU
- Set "System power plan" to High performance
- Set "Core parking index" to 100%
- Set "Turbo boost index" to 100%
- Set "Frequency scaling index" to 100%
- Apply.

18) Reduce Ping and Fix Lag
- Go to the PingBooster page
- Signup and Download the PingBooster.
- Verify the Email
- Install the PingBooster application.
- Run the PingBooster.
- Click Scan Games button and select Monster Hunter World
- After that, select server and click "Start Game" button.
In addition, those who experience freezing and crashing problems should also take a look at my "How to Fix High CPU Usage in Monster Hunter World" guide.
After you have done everything, do not forget to restart the computer!


cool, thanks for the tips! greatly appreciated