
Hey, brave souls! Whether you're exploring the horrific world of The Outlast Trials alone or with your friends, one thing is definitely certain: the only terrifying thing should be the game's content, not technical glitches and errors! So, let's jump into solutions to fix the common issues in The Outlast Trials like crashing, not launching, or the infamous UE4 Error. Buckle up, because we're about to get technical!
A Brief Overview of The Outlast Trials
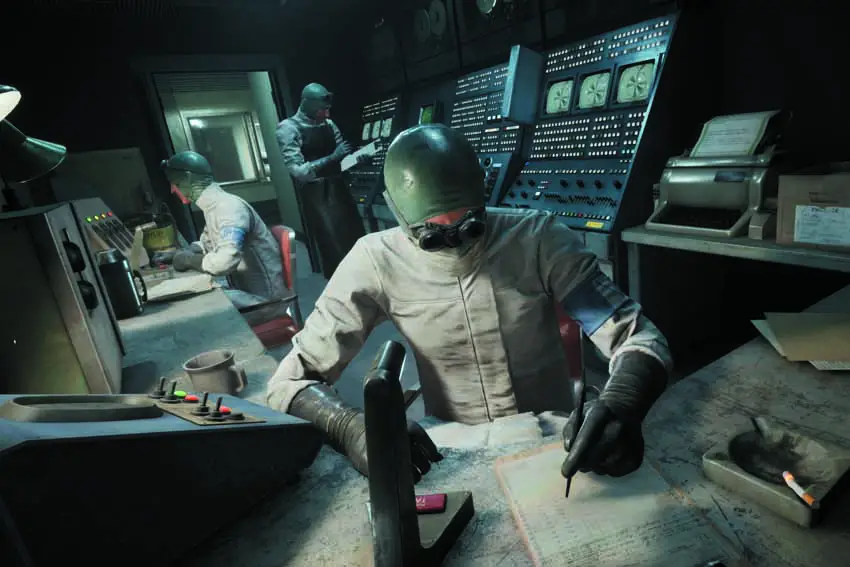
Firstly, a quick rundown of what this game is all about. Developed and published by Red Barrels, The Outlast Trials is an early access, first-person psychological horror survival game. Set in the Cold War era, you're an involuntary recruit, subjected to brainwashing and mind control experiments by the Murkoff Corporation. Your task? To survive, either alone or cooperatively, ultimately completing the Trials and MK-Challenges to earn your freedom. Yet, remember: completing these harrowing tests may leave you questioning your sanity!
Fixing The Outlast Trials Crashing, Not Launching, UE4 Error Issues: A Step-by-Step Guide
You've armed yourself with a strong nerve and readiness to face the trials. But alas, the game keeps crashing or doesn't even launch. Or perhaps the UE4 Error is haunting you. No worries, we're here to help you navigate these issues.
1. Verify and Repair Game Files
If The Outlast Trials is giving you a hard time by crashing or not launching at all, one of the very first solutions to apply is to verify your game files and repair any corrupted ones. This procedure checks all your game files against the ones in the game servers and fixes any discrepancies by replacing or repairing them.
Let's get this done! Remember, though, the process varies slightly depending on your game launcher, so we'll go through both Steam and Epic Games Launcher.
Verifying Game Files on Steam
Steam users, you're up first. Follow these steps to verify your game files:
- Open your Steam client. After all, that's where the magic happens!
- Head over to the LIBRARY. This is where all your games are tucked away.
- In your library, locate The Outlast Trials. We're sure it's there, lurking somewhere!
- Once you find the game, right-click on it. A drop-down menu will pop up.
- From the drop-down menu, select Properties. This will open a new window with multiple tabs.
- Navigate to the Local Files tab. This is where you'll find the option we're looking for.
- In the Local Files tab, click on Verify Integrity of Game Files. Steam will now check all your game files one by one and repair any problematic ones.
That's it, you've done it! Remember, this process may take a few minutes, so grab a snack and let Steam work its magic.
Verifying Game Files on Epic Games Launcher
If you're an EGS user, don't worry, we haven't forgotten about you! Here's how to verify your game files on the Epic platform:
- Open your Epic Games Launcher.
- Click on Library on the left-hand menu. This is your gateway to all your Epic Games.
- Find The Outlast Trials in your game list. Just scroll down if you have to.
- Once you spot the game, you'll notice three dots right below it. Click on those three dots.
- A new menu will appear. From here, select Manage.
- Then click on the Verify button. Epic will now start the verification and repair process for your game files.
You're all set! The verification process may take some time, but patience is the key here. Let Epic do its thing, and soon enough, you'll be back into the trials!
Remember, verifying game files is usually a quick and simple fix for many game issues. It's like giving your game a fresh coat of paint, smoothing out any rough edges and making sure everything is in order. Most importantly, it doesn't affect your game progress, so feel free to run this verification anytime you encounter issues.
2. Use -dx11 in the Game Parameters
Secondly, if verification doesn't solve the problem, you might want to force the game to use DirectX 11. To do this, simply add -dx11 in the game parameters or launch options.
In Steam, right-click on the game, select Properties, and in the General tab, enter -dx11 into the Launch Options box.
In the Epic Games launcher, click on your profile picture in the top-right. Then select Settings, scroll down, and click on The Outlast Trials. After that tick the "Additional Command Line Arguments" and type -dx11 into the box.
3. Run as Administrator and in Windows 7 Compatibility Mode
Naturally, another common yet undeniably effective solution when The Outlast Trials isn't launching or crashes unexpectedly is to run the game as an administrator. Additionally, running the game in Windows 7 compatibility mode can sometimes help. Without a doubt, this process is a lot easier than it sounds, and I'll walk you through it.
How to Run The Outlast Trials as an Administrator
- First and foremost, navigate to the folder where your game is installed. If you're unsure where that is, a quick search in your file explorer should help you out.
- In the game's folder, find the game's executable file.
- Once you've found the file, right-click on it to bring up a context menu.
- From this menu, select Properties. This will open a new window with several tabs.
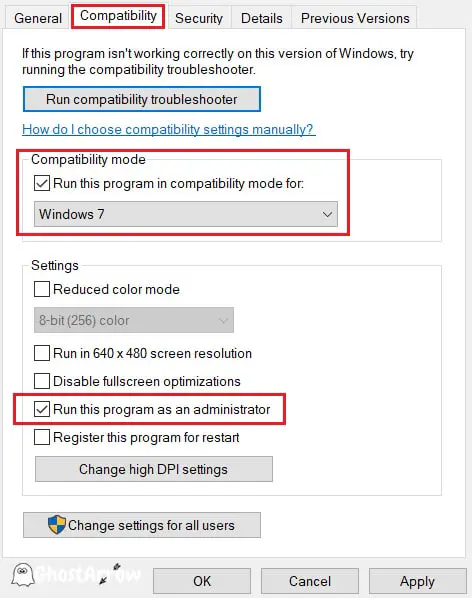
- Head over to the Compatibility tab. Here we can make the necessary changes.
- In the Compatibility tab, you will see a checkbox that says 'Run this program as an administrator'. Tick this box.
- Click Apply, and then OK to save your changes.
You have now successfully set the game to run as an administrator!
How to Run The Outlast Trials in Windows 7 Compatibility Mode
While you're in the Compatibility tab (from the previous steps), running the game in Windows 7 Compatibility Mode is just a couple of clicks away. Here's how:
- Still, in the Compatibility tab, you'll see a section called "Compatibility mode".
- In this section, there's a checkbox that says "Run this program in compatibility mode for:". Go ahead and tick this box.
- A drop-down menu will become available once you tick the box. Click on it and select Windows 7.
- Hit Apply, then OK to save your changes.
Note: You should also try disabling fullscreen optimizations. Just tick the "Disable fullscreen optimizations" box as well.
4. Update Graphics Drivers
It's often overlooked but extremely crucial: always ensure your graphics drivers are up-to-date to get rid of crashing issues in The Outlast Trials. So, whether you're using Nvidia, AMD, or Intel, visit the official website and download the latest drivers for your graphics card.
- Nvidia GPU: https://www.nvidia.com/en-us/geforce/drivers/
- Amd GPU: https://www.amd.com/en/support
- Intel GPU: https://downloadcenter.intel.com/product/80939/Graphics
5. Install Visual C++ Redistributables
Undeniably, another common solution to various PC game problems is to ensure you have all the required Microsoft Visual C++ Redistributable packages installed on your system. It's an essential component for running games that are developed with Visual C++. Therefore, without further ado, let's get those packages installed on your system!
You could install them individually, but there's a more convenient way – using an all-in-one solution that installs all the packages at once. One such solution is the Visual C++ Redistributable Runtimes All-in-One. Here's a step-by-step guide to help you out:
- First off, download the Visual C++ Redistributable Runtimes All-in-One package. You can find it at https://www.techpowerup.com/download/visual-c-redistributable-runtime-package-all-in-one/.
- Once you're on the page, click on the Download button. A zip file will start downloading.
- After the zip file has been downloaded, right-click on it and select Extract All. Extract it to a location you can easily access.
- Navigate to the location where you've extracted the file. You'll find an executable file named "install_all.bat".
- Right-click on install_all.bat and select Run as administrator. This is crucial for the proper installation of the packages.
- A command prompt window will open and the installation process will start. All you need to do is wait. It will automatically install all the Visual C++ Redistributables for you.
- Once the command prompt window closes, it means the installation process has finished.
In fact, with these steps, you have now installed all necessary Visual C++ Redistributable packages on your system. Now, it's time to test the game again. Hopefully, this time The Outlast Trials will start without a hitch. As always, make sure to restart your computer after these steps to make sure all changes take effect properly.
6. Install/Reinstall DirectX
If The Outlast Trials gives you a DirectX error and refuses to start, reinstalling DirectX can be a lifesaver. DirectX is indeed the engine that powers many of the graphics in your games, and without it running correctly, your gaming experience can be seriously hampered. But fear not! Reinstalling DirectX is not as daunting as it might seem, and I'm here to guide you through the process.
Step 1: Download DirectX
The first step is definitely to download the DirectX installer. You can get it from the official Microsoft website at this link: https://www.microsoft.com/en-us/download/details.aspx?id=8109. Click on the Download button and save the installer (directx_Jun2010_redist.exe) to a location you can easily access, like your Downloads folder.
Step 2: Create a New Folder on Your Desktop
Before we run the installer, we need to prepare a spot for it to unpack all its files. For this, we'll create a new folder on your desktop. Here's how:
- Right-click on an empty space on your desktop.
- Select New.
- Choose Folder.
- Give the folder a name you'll recognize (something like "DirectX" works perfectly).
Step 3: Run the DirectX Installer
With the new folder ready, it's time to unpack the DirectX installer.
- Navigate to where you downloaded the directx_Jun2010_redist.exe file and double-click on it to run it.
- When the installer opens, it will ask if you accept the agreement. Select Yes.
- Click on the "Browse..." button. This will open a file explorer window.
- Navigate to your desktop and select the new folder you created in the previous step. Click on OK.
- Press the OK button again on the installer.
The installer will now extract all the necessary DirectX installation files to the folder you specified.
Step 4: Run the DirectX Setup
- Once the extraction is finished, navigate to the new folder on your desktop.
- Find the DXSETUP.exe file and double-click on it to run the DirectX setup.
- Follow the on-screen instructions to install DirectX.
And there you have it! With these steps, you have successfully installed/reinstalled DirectX on your system. Now it's time to play The Outlast Trials without crashing.
7. Limit the FPS
If The Outlast Trials crashes randomly during missions, randomly, limiting the FPS can help. You can do this via the Nvidia Control Panel, AMD software, or the RTSS (RivaTuner Statistics Server). You might find that the game is more stable at a lower frame rate.
Nvidia Control Panel:
- Right-click on your desktop and open the Nvidia Control Panel.
- Then, go to Manage 3D settings.
- In the Program Settings tab, add The Outlast Trials.
- Scroll down to find the Max Frame Rate option and set it to a lower value (e.g., 60 or 120).
AMD software:
- Open AMD Radeon Settings or AMD Radeon Software.
- Next, go to the Gaming section.
- Add The Outlast Trials and find the Frame Rate Target Control and set it to a lower value.
RTSS:
- Open the RTSS.
- Add The Outlast Trials to the list.
- After that, set the Framerate limit to a lower value.
8. Temporarily Disable Your Antivirus
Here's a surprise contender in our list of potential crash instigators: your antivirus software. Yes, you heard it right! As odd as it may seem, sometimes the very software designed to protect your system could interfere with your gaming experience. Indeed, programs like Comodo Internet Security and other similar antivirus software might misinterpret game files as threats, leading to blockages that prevent The Outlast Trials from running smoothly.
While antivirus software plays a crucial role in protecting your computer from harmful viruses, malware, and other threats, they can sometimes be a little overzealous in their protective duties. This can result in the software blocking or quarantining certain files that are essential for the proper functioning of your game.
So, what can you do in such a scenario? Here's the step-by-step process:
- Open Your Antivirus Software: The first step, naturally, is to open the antivirus software installed on your computer. Look for its icon in your system tray or search for it in your start menu.
- Navigate to Settings: Once you have the antivirus software open, look for a settings or options menu. The exact location and name of this menu can vary depending on the antivirus software you're using.
- Disable the Antivirus Temporarily: Within the settings menu, you should find an option that allows you to disable the software temporarily. Again, the wording and location of this option will vary, but it should be there. Make sure you choose to disable it only temporarily, as you don't want to leave your computer unprotected for too long!
Remember, this is just a temporary solution, and it's vital to enable your antivirus protection as soon as you're done gaming. If The Outlast Trials run smoothly with the antivirus disabled, you might want to consider adding the game to your antivirus software's whitelist or exceptions list, thereby preventing the software from blocking its operations in the future.
Final Thoughts: Overcoming The Outlast Trials Crashing Problems
Always, fixing crashing issues in The Outlast Trials can be a tedious task. But, undeniably, with a little bit of patience and tinkering, you can most certainly get back to enduring the psychological horrors of The Outlast Trials. These aforementioned methods are not a one-size-fits-all solution, but they've helped many players in the past and might just be the answer for you, too.
Most importantly, always make sure your PC meets the game's minimum system requirements. If not, all the fixes in the world may not make it run properly.
Even with the game now running smoothly, you might still want to extract every ounce of performance from your PC to make your gaming experience absolutely the best it can be. So, what's next on the agenda?
Well, we've prepared another spectacular guide just for you: "How to Boost PC Performance for Gaming" This guide is packed full of tips and tricks to help you squeeze every drop of performance out of your gaming rig, leading to higher frame rates and an even better gaming experience.
So why wait? Dive in and discover how you can take your gaming to the next level. You won't regret it!