Are you tired of experiencing frustrating performance issues while exploring the vast universe of The Outer Worlds & Spacer's Choice Edition on your PC? Fear not, as I have the ultimate guide to boosting your FPS and elevating your gaming experience to new heights.
It appears that the new Spacer's Choice Edition of The Outer Worlds has hit a bit of a snag. Reports have surfaced that players are experiencing constant stuttering and horrible performance compared to the original release.
It's a disappointing revelation for those eagerly anticipating the updated edition, as the lagging and stuttering can be a real immersion breaker. While the original version ran smoothly, it seems that the Spacer's Choice Edition has some kinks to work out.
I've compiled a comprehensive list of 16 foolproof methods to help you overcome any stuttering, lagging, freezing, FPS drop, or spikes that may be hindering your gameplay. And it all starts with ensuring that your system requirements are up to par and tweaking your graphics settings accordingly.
So, strap in and get ready to journey through the Outer Worlds with unparalleled speed and fluidity. Let's dive in!
The Outer Worlds System Requirements
| Minimum System Requirements | Recommended System Requirements | |
| CPU | Intel Core i3-3225 or AMD Phenom II X6 1100T | Intel Core i7-7700K or Ryzen 5 1600 |
| GPU | Nvidia GTX 650 Ti or AMD HD 7850 | GeForce GTX 1060 6GB or Radeon RX 470 |
| RAM | 4 GB RAM | 8 GB RAM |
| Storage | 40 GB available space | 40 GB available space |
| OS | Windows 7 (SP1) 64bit | Windows 10 64bit |
The Outer Worlds: Spacer's Choice Edition System Requirements
| Minimum System Requirements | Recommended System Requirements | |
| CPU | Intel Core i7-6700 or AMD Ryzen 5 1600 | Intel Core i7-8700 or AMD Ryzen 5 3600 |
| GPU | GeForce GTX 1060 6 GB or Radeon RX 590 | GeForce GTX 1080 Ti or GeForce RTX 2070 or Radeon RX 6700 XT |
| RAM | 12 GB RAM | 16 GB RAM |
| Storage | 62 GB available space | 62 GB available space |
| OS | Windows 10 64-bit | Windows 10 64-bit |
1) Best Graphics Settings for The Outer Worlds
When The Outer Worlds: Spacer's Choice Edition was released, many players were disappointed to find that DLSS, FSR, and Ray Tracing options were not available. DLSS and FSR would be game-changers for boosting performance, but alas, they are absent. However, all is not lost! There are still ways to optimize your graphics settings and improve your gaming experience.
The most impactful settings to adjust are "Visual Effects" and "Screen Space Global Illumination". Lowering these settings can make a huge difference in eliminating stuttering and FPS drops. It's recommended to set "Visual Effects" to medium or lower for optimal results.
Another setting to enable is Dynamic Resolution, which reduces the workload on your GPU and maintains a stable target frame rate. This can be a real lifesaver for those experiencing performance issues.
While lowering the "3D Resolution" setting can provide a slight boost in FPS, it comes at the cost of reduced graphics quality. If you're playing in 4K or 2K resolution, try lowering the "3D Resolution" to 70-80% to find a good balance.
To avoid micro stuttering, it's recommended to turn off Vertical Sync. And while Fullscreen window mode is typically better for performance, Borderless is more suitable for ultra-widescreen resolutions like 21:9.
Remember to restart the game after making these adjustments, as failure to do so may result in frustrating stuttering issues. With these optimizations in place, you'll be ready to explore the Outer Worlds with ease!
2) Launch Options
For those seeking to optimize their gameplay experience in The Outer Worlds, utilizing launch options can be a game-changer. And the good news is that it's easy to do!
Epic Games launcher:
- Open the Epic Games launcher.
- Click on your avatar located in the top right-hand corner of the screen.
- Select the "Settings"
- Scroll down and click on The Outer Worlds under the "Manage Games" section.
- Check the "Additional Command Line Arguments" box.
- Paste the following command into the box: "-USEALLAVAILABLECORES".
- Save your changes and close the launcher.
Steam:
- Open the Steam client.
- Go to your game library and right-click on The Outer Worlds.
- Select "Properties" from the drop-down menu.
- Enter the following command into the Launch Options box: "-USEALLAVAILABLECORES".
- Close the window.
With these launch options enabled, you'll be able to take advantage of all the cores on your system and improve your gaming performance.
3) Update Your Graphics Drivers
If you're experiencing performance issues in The Outer Worlds, updating your graphics drivers is an essential step toward improving your gameplay experience.
For NVIDIA graphics card users, simply visit the NVIDIA website and download the latest drivers available. On the other hand, AMD graphics card users can head over to the AMD website to download and install the latest drivers.
In addition to NVIDIA and AMD graphics card users, those with an Intel graphics card can also benefit from updating their graphics drivers.
To update your Intel graphics drivers, head over to the Intel Driver & Support Assistant website and follow the prompts to download and install the latest drivers available.
Whether you have an NVIDIA, AMD, or Intel graphics card, keeping your drivers up-to-date is crucial for optimizing your system's performance and enhancing your gaming experience in The Outer Worlds.
4) NVIDIA Control Panel Settings
Fine-tuning your NVIDIA Control Panel settings can go a long way in improving your gaming performance in The Outer Worlds. Here's how you can adjust your settings for optimal gameplay:
- Open the NVIDIA Control Panel.
- Navigate to Manage 3D Settings > Program Settings > Add
- Select The Outer Worlds from the list
- Then, set Antialiasing - Mode to "Off".
- Set Power Management mode to Prefer maximum performance
- Set Vertical Sync to "Off".
- If you're using a notebook, ensure that you've selected the "High-performance NVIDIA processor" as your preferred graphics processor.
By disabling antialiasing and vertical sync, you can eliminate unwanted visual effects and reduce input lag. Selecting the "High-performance NVIDIA processor" on notebooks ensures that the game is utilizing your dedicated graphics card instead of the integrated graphics, resulting in smoother gameplay.
5) AMD Radeon Settings
Here are the steps to optimize your AMD Control Panel settings for The Outer Worlds:
- Open the AMD Radeon Software.
- Go to the "Gaming" tab and then click on "Global Graphics".
- Turn off Anti-Aliasing.
- Set Texture Filtering Quality to "Performance".
- Set Surface Format Optimization to "On".
- Set Wait for Vertical Refresh to "Always Off".
- Set Tessellation Mode to "Override Application Settings" and set the value to "8x" or lower.
- Turn on Radeon Chill and set the minimum and maximum frame rate to your monitor's refresh rate.
- Set Radeon Boost to "On" and adjust the slider to your liking.
By disabling anti-aliasing and turning off vertical refresh, you can reduce input lag and improve overall performance. Adjusting texture filtering quality and surface format optimization can also result in smoother gameplay. Utilizing Radeon Chill and Radeon Boost can help manage your graphics card's resources and further improve performance.
6) Intelligent Standby List Cleaner
Intelligent Standby List Cleaner monitors and clears the standby list when it becomes too large, preventing stutters and improving overall system performance. The “Intelligent standby list cleaner” application will monitor and clear the memory standby list when it is > 1000mb (1gb). It will help players to fix stutters in games. With these simple steps, you can optimize your system and ensure a smooth gaming experience.
- Download the Intelligent standby list cleaner from the official website.
- Extract the files from the 7-zip archive to a folder of your choice.
- Open the folder and run the "Intelligent standby list cleaner ISLC" application.
- Enable the options "Start ISLC minimized and auto-Start monitoring" and "Launch ISLC on user logon" for convenience.
- Click the "Start" button to begin monitoring your system's standby list.
- Minimize the application to the system tray and forget about it.

7) Full-screen Optimizations
Disable full-screen optimizations to boost your game's performance. Follow these steps:
- Navigate to the folder where the game is installed, for example, H:\Epic Games\TheOuterWorlds.
- Go to the Win64 folder by following the path Indiana\Binaries\Win64.
- Right-click on the IndianaEpicGameStore-Win64-Shipping.exe application in the Win64 folder.
- Click on Properties.
- Select the Compatibility tab.
- Tick the "Disable fullscreen optimizations" option.
- Click OK to apply the changes.
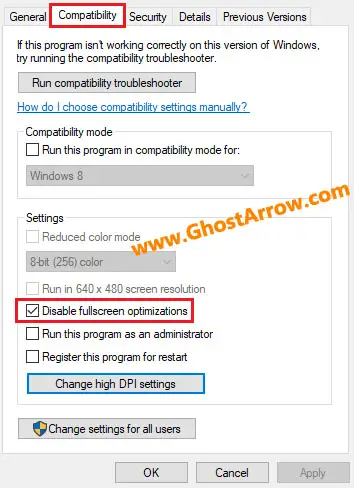
This simple tweak can help you get the most out of your gaming experience.
8) Power Options
To optimize your computer's power settings for gaming, follow these steps:
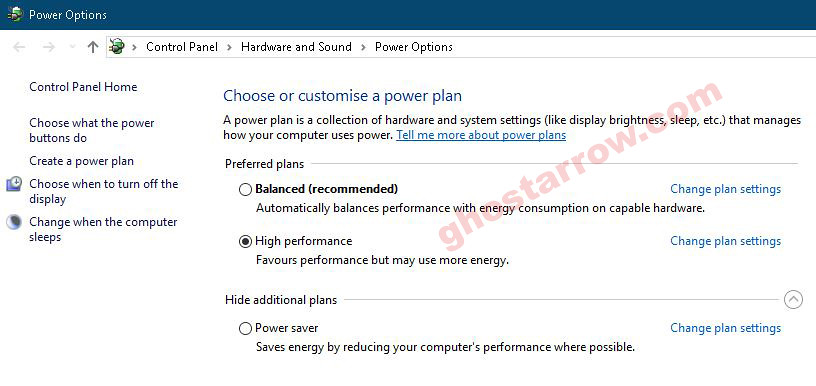
Note: If your CPU cooler is not capable of handling high temperatures, it's recommended to skip this setting. Increasing the processor state to 100% may cause the processor temperature to rise by 5-6 degrees.
- Right-click on the Windows icon located in the bottom left corner of your screen.
- Click on the "Power Options" button from the pop-up menu.
- In the Power Options window, click on the "Additional power settings" link.
- Choose the "High performance" option from the Preferred plans tab.
- Next, click on the "Change plan settings" link located next to the High performance option.
- Tap on the "Change advanced power settings" option.
- Look for "Processor power management" in the list and click on the plus sign (+) icon on the left side.
- Set both "Minimum processor state" and "Maximum processor state" to 100%.
- Finally, click on the "OK" button to save the changes.
9) Game Mode, Game Bar, and Captures
To disable Game Mode, Game Bar, and Captures, follow these steps:
- Press the Windows key + I to open the Settings menu.
- Click on Gaming.
- Click on Game Mode in the left pane.
- Toggle off the Game Mode switch.
- Click on Captures in the left pane.
- Toggle off the Record in the background while I'm playing a game, Record audio when I record a game, and Show audio warnings switches.
- Click on Xbox Game Bar in the left pane. Then toggle on it.
Note: If you are using an older version of Windows 10 and do not see the Game Mode settings, you can configure the settings directly in the Registry.
- Press the Windows logo key and R key simultaneously on your keyboard.
- Type regedit
- Press the Enter key.
- The Registry Editor will open. In the left panel, Navigate to HKEY_CURRENT_USER\Software\Microsoft\GameBar
- Right-click inside the panel and select New
- Click on the DWORD (32-bit) Value

- Rename the New Key to AllowAutoGameMode
- Right-click on the AllowAutoGameMode
- Select the Modify…
- Set the “Value data” to 0
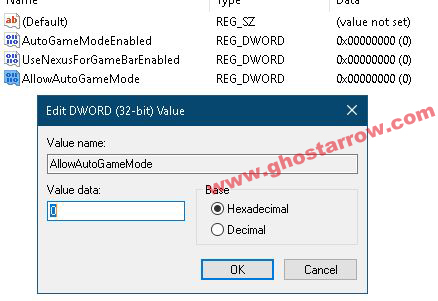
- Click on the OK button.
- Close the Registry Editor.
- Restart your PC.
10) Windows Performance Options
Adjusting the performance options for Windows can improve overall system performance and help to optimize gameplay. By selecting "Adjust for best performance", Windows will turn off all visual effects that may be taking up system resources and slowing down performance. This can include things like animations, transparency, and other visual effects. It's important to note that this will change the appearance of Windows and may make it look less visually appealing, but it can be a useful step in improving performance.
To access the Windows Performance Options:
- Type "performance" in the search bar on the bottom left of the Windows screen.
- Click on "Adjust the appearance and performance of Windows" from the search results.
- In the Performance Options window that opens, select "Adjust for best performance" from the options.
- Click "OK" to apply the changes.

Note: If you don't like the changes, you can easily restore the previous settings by selecting "Custom" and checking the options you prefer.
11) Cleaning Temporary Files
To clean up temporary files on your computer, follow these steps:
- Press the Windows logo key and R on your keyboard simultaneously.
- In the Run dialog box that appears, type "%temp%" (without the quotes) and press Enter.
- Delete everything in the Temp folder that opens. You can skip any undeleted files.
- Again, press the Windows logo key and the letter R on your keyboard simultaneously.
- In the Run dialog box, type "temp" (without the quotes) and press Enter.
- Delete everything in the folder that opens.
- Once more, press the Windows logo key and the letter R on your keyboard simultaneously.
- In the Run dialog box, type "prefetch" (without the quotes) and press Enter.
- Delete everything in the Prefetch folder that opens.
- Finally, empty the Recycle Bin.
12) SSD
If your computer has a Solid-State Drive (SSD), it is highly recommended to install the game on the SSD. This can significantly reduce loading times and improve overall game performance. Alternatively, you can move the game files to the SSD after installation to achieve the same benefits.
13) Optimize the Discord
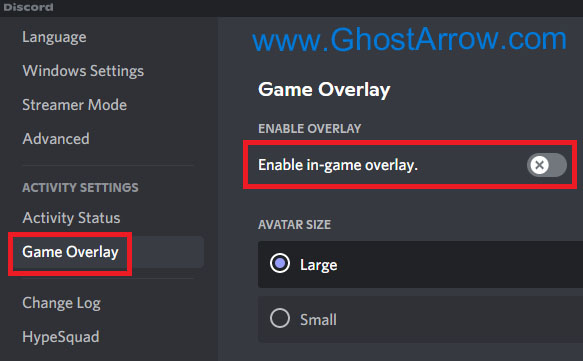
To improve game performance, you may want to optimize your Discord settings by disabling Hardware Acceleration and the in-game overlay. Here's how:
- Open Discord and click on the User Settings icon (gear icon).
- Click on Game Overlay and toggle off the "Enable in-game overlay" option.
- Next, click on the Advanced menu.
- Disable Hardware Acceleration.
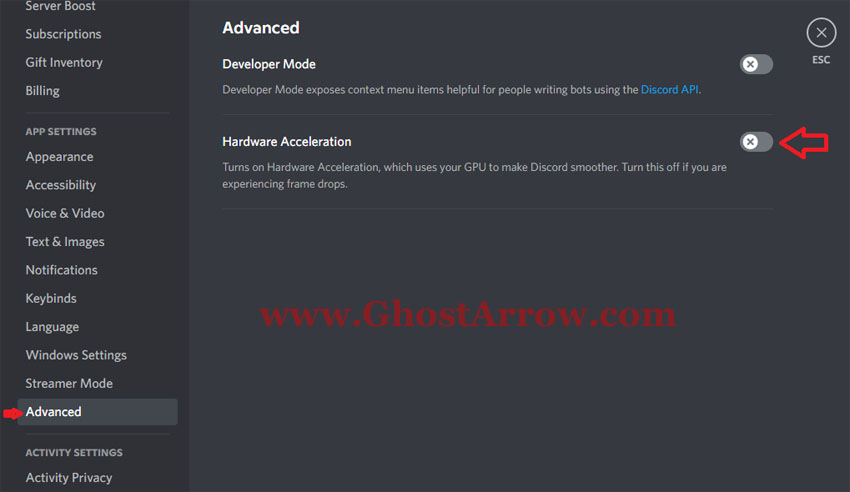
- Restart Discord for the changes to take effect.
14) Optimize the Google Chrome
If you’re using Google Chrome, you’ll need to make this setting.

- Go to settings page in Chrome
- Click the Advanced
- Go to the System tab
- Finally, uncheck the “Continue running background apps when Google Chrome is closed”
15) Background Processes
To optimize your gaming experience, it's recommended to close all unnecessary applications running in the background. This includes web browsers, file-syncing services like OneDrive, and any other programs that are not required for gaming.
If you're using Discord, consider quitting the app when it's idle or not required. This will free up system resources and help improve game performance.
16) Adjust Process Priority
Each time you start the game, you should adjust this setting.
- Launch The Outer Worlds.
- Press the ALT and TAB keys simultaneously to minimize the game.
- Open the Task Manager.
- Click on the Details tab.
- Locate the IndianaEpicGameStore-Win64-Shipping.exe application in the list.
- Right-click on the IndianaEpicGameStore-Win64-Shipping.exe application and set the priority to High.
If you encounter stuttering issues in The Outer Worlds, do not set the priority to High. Instead, set it to Normal.
Note: If you want to restore the priority settings to the default, simply close the game, and the priority settings will reset.
Remember, every PC is different, and some settings may need to be adjusted based on your individual hardware and software configuration. Don't be afraid to experiment and find the settings that work best for you. With a little bit of tweaking, you can enjoy smoother and more enjoyable gaming sessions. Good luck and have fun!

