
The Outer Worlds: Spacer’s Choice Edition is the latest version of the award-winning sci-fi RPG from Obsidian Entertainment. It includes the base game and all the DLCs, as well as some new features and improvements. However, some players may still face black screen, crashing, and not launching problems when trying to run the game.
The Outer Worlds may crash after the intro video or fail to launch at all. If you are looking for ways to fix these issues, here are some possible solutions you can try.
Method #1: Update Graphics Drivers
One of the possible causes of the black screen and crashing issues is outdated graphics drivers. Graphics drivers are software that allows your PC to communicate with your graphics card and display the game correctly.
If your drivers are not up to date, they may not be compatible with the game or cause performance issues. To update your drivers, download the latest drivers for your graphics card from the official website.
- NVIDIA: https://www.nvidia.com/en-us/geforce/drivers/
- AMD: https://www.amd.com/en/support
- Intel: https://www.intel.com/content/www/us/en/download-center/home.html
Make sure you choose the right drivers for your operating system and graphics card model.
Note: You can use DDU to uninstall your current drivers completely. DDU is a tool that removes all traces of your old drivers from your PC. This will prevent any conflicts or errors with the new drivers.
Method #2: Verify Game Files
Verifying the integrity of game files is a common method to fix various game issues, including black screen and crashing problems. When you verify the game files, the system checks for any corrupted or missing files and replaces them with the correct ones.
Fortunately, verifying the integrity of The Outer Worlds files is a straightforward process. If you have purchased the game on Steam, you can easily verify the game files by following these steps:
- Go to the Library section
- Select The Outer Worlds, and click on Properties
- From there, click on the Local Files tab
- Then click on Verify integrity of game files. The Steam client will then begin to verify the game files, and once it's done, it will download any missing or corrupted files.
On the other hand, if you have purchased The Outer Worlds from the Epic Games Store, the process is slightly different.
- First, you need to launch the Epic Games Launcher
- Go to the Library section.
- Find The Outer Worlds in the list of games and click on the "..." icon to the right of it.
- Next, select Manage
- Click on Verify to start the verification process. The Epic Games client will then check the game files and download any missing or corrupted files.
By verifying the integrity of game files, you can ensure that the game's files are complete and not corrupted, which can help resolve issues that might be preventing you from playing The Outer Worlds.
Method #3: Exit Background Programs
You can also try closing other programs that may interfere with The Outer Worlds. Some examples of these programs are:
- MSI Afterburner
- EVGA Precision X1
- RTSS Rivatuner
- ASUS GPU Tweak II
- Fraps
- Discord
- Skype
- Keyboard and mouse software
- Nvidia GeForce Experience
- AutoHotKey
- Script apps
Method #4: Adjust Configuration Files
If you're experiencing issues with The Outer Worlds, adjusting the configuration files may help to solve the problem. This solution involves navigating to the configuration files location and editing the GameUserSettings.ini file. However, finding the correct settings can be challenging. I will show you the step-by-step process to adjust the configuration files:
- Go to the configuration files location. Navigate to C:\Users\*username*\AppData\Local\Indiana\Saved\Config\WindowsNoEditor
If you bought The Outer Worlds from the Microsoft Store, C:\Users\*username*\AppData\Local\Packages\PrivateDivision.TheOuterWorldsWindows10_hv3d7yfbgr2rp\LocalCache\Local\Indiana\Saved\Config\WindowsNoEditor\ - Open the GameUserSettings.ini file in the WindowsNoEditor folder.
- Find the FullscreenMode in the file and set the value to 2
FullscreenMode=2 - Find the LastConfirmedFullscreenMode in the file and set the value to 2
LastConfirmedFullscreenMode=2 - Find the PreferredFullscreenMode in the file and set the value to 0
PreferredFullscreenMode=0 - Find the FrameRateLimit in the file and set the value to 60.000000
FrameRateLimit=60.000000 - Save and Exit the file.
If you can’t see the AppData folder, click on the View, select the Hidden items

Method #5: Update OS and Other Drivers
Keeping your operating system up-to-date is crucial for maintaining optimal performance and security. In addition to regular updates to fix bugs and improve functionality, operating system updates also include important security patches that keep your system safe from potential threats.
To update your operating system, navigate to Settings in Windows 10 or Windows 11 and click on Update & Security. From there, check for any available updates and install them.
It is also important to update your device drivers, including the Bios, Audio, Lan, and Chipset drivers, as outdated drivers can cause performance issues and even system crashes. To update these drivers, visit the manufacturer's website and look for the most recent drivers for your device.
Method #6: Download Media Feature Pack
If you are experiencing crashes with a black screen when playing The Outer Worlds, downloading and installing the Media Feature Pack for N versions of Windows 10 may be a potential solution. The N versions of Windows 10 do not come with certain media-related features, which can cause issues with some games, including The Outer Worlds.
To install the Media Feature Pack, go to the official Microsoft website and search for the appropriate version for your operating system. After downloading the Media Feature Pack, run the installation process, and then try running The Outer Worlds again to see if the issue has been resolved.
- Go to the https://www.microsoft.com/en-us/software-download/mediafeaturepack
- Select your version of Windows from the edition list.
- Click on Confirm button.
- After that, click on “64-bit Download” button
- Once the download process is finished, proceed with the installation of the downloaded file.
Method #7: Turn Off Overclock
Overclocking is a technique used to push the limits of a computer's hardware beyond their manufacturer's specifications to gain extra performance. However, it can lead to overheating, instability, and crashes, especially when playing resource-intensive games such as The Outer Worlds.
To prevent crashing in The Outer Worlds, it is recommended to turn off the overclocking feature in your computer's BIOS/UEFI and GPU software. This will ensure that your hardware is running at its default clock speed and voltage, which is the recommended configuration for optimal performance and stability.
Method #8: Install Visual C++ Runtimes
To avoid encountering errors and issues when running The Outer Worlds, one important step is to make sure that all necessary Visual C++ Runtimes are installed on your computer.
Installing Microsoft Visual C++ Runtimes can be achieved by downloading and running the "All in One Runtimes Download" tool. Once you have downloaded the tool, run the executable file and click on the "Installieren" button.
This will initiate the installation process and allow you to repair or install any missing Visual C++ Runtimes that are required for the game. This step is crucial as it ensures that your system has all the necessary components to properly run The Outer Worlds, thus minimizing the risk of crashes and other errors.
Method #9: Disable All Services
If you are experiencing crashes or freezes while playing The Outer Worlds, disabling all non-essential services on your PC can help to identify any conflicts or compatibility issues. You can do this by using the System Configuration tool in Windows.
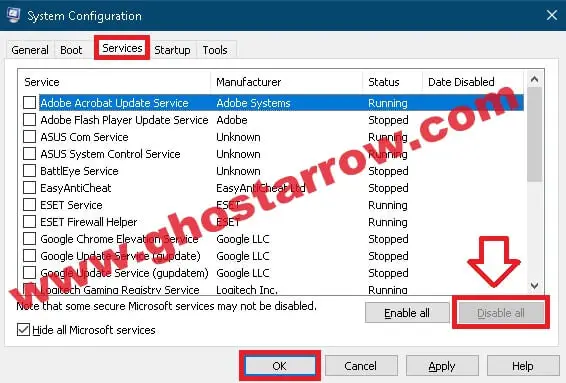
- Simply type "msconfig" in the Windows search box
- Then go to the Services tab.
- From there, check "Hide all Microsoft services"
- Click on the "Disable all" button
- Finally, click on the OK button and restart your PC.
This will disable all non-Microsoft services from running in the background, allowing you to see if the game runs more smoothly without them.
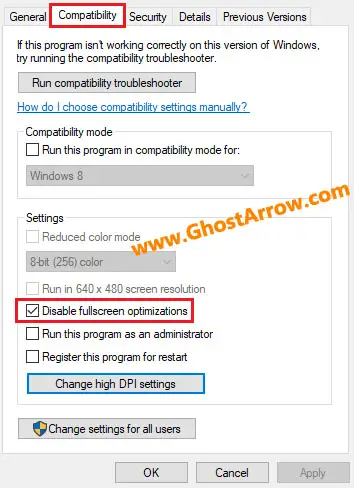
Method #10: Disable Fullscreen Optimizations
Fullscreen optimizations are a feature in Windows 10 that allows applications to run in fullscreen mode with better performance and compatibility. However, some users may experience issues with games and applications when this feature is enabled.
Disabling fullscreen optimizations can sometimes help fix any issues that you may be experiencing while playing The Outer Worlds in fullscreen mode.
- Navigate to the folder where the game is installed.
- Right-click on TheOuterWorlds.exe, then select Properties.
- In the Properties window, go to the Compatibility tab.
- Check the box next to “Disable fullscreen optimizations”.
- Click OK.
I hope that these solutions are helpful in resolving the issue. If you continue to encounter the problem, please do not hesitate to leave a comment below, and I will do my best to assist you further.
This could also be related to a corrupted, outdated, or missing XAPOFX1_5.DLL
This was happening to me, I would press play on Steam, and nothing. When manually starting theouterworlds.exe , I would get the XAPOFX1_5.DLL error. I fixed it buy downloading the XAPOFX1_5.DLL file from the internet, and replacing the one in my System32 folder.
Please add this to your troubleshoot list.
Number 6 did it for me. I run Win10 on a bootcamp macbook pro 2019.